Pepper Design Blog

A Little of This & That... Renovating, Decorating, DIY Projects & Family

pepper_header_flower

Project Nursery: A *New* Ottoman for the Glider

June 3, 2011 by Morgan

So this might be a little old hat for some of you DIYers out there, but just in case you’re a little reserved on taking the plunge into basic upholstering (and you have a barstool or kitchen chair that’s nagging at you), here’s a recent project that we finished for the nursery that involves just that.
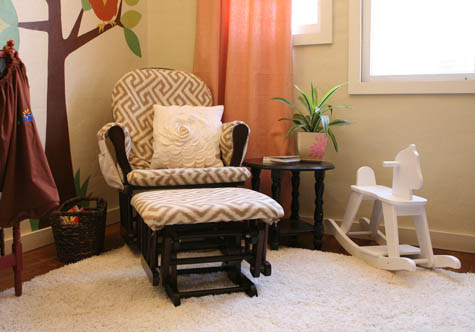
Our everyday average (but super comfy) glider received a makeover a few months ago, but the ottoman was slow to follow. It’s finally a matching pair!

*****************************************************************************************

Basic Upholstery 101

a
Materials: Staple gun, fabric, scissors, batting or foam (this is optional depending on the current condition of your cushion – I didn’t need extra batting/foam for this project but you could add quilt batting over the top of your foam for a little extra comfiness, or replace the foam altogether. You’ll repeat step 1 with the batting first if you choose to add.)

{1.} When measuring and cutting out your fabric for your new cushion, be sure to account for the outside edge of the ottoman, stool, chair, etc that you’re reupholstering. The top of my ottoman is only 20″x12″, but when I add the sides and extra hem space I’m cutting my fabric to 30″x22″ to allow for 5″ extra on each side (2″ for the lip of the ottoman and 3″ for the underside where I’ll use the staple gun).

If your fabric involves a pattern, make sure that the pattern is aligned with your edges so that you don’t end up with a crooked design.
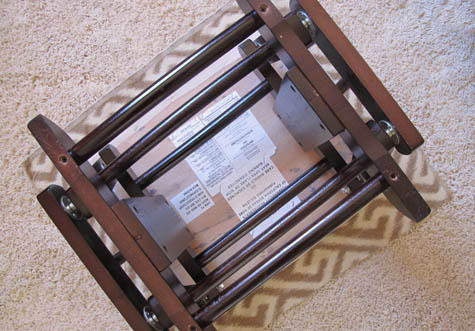
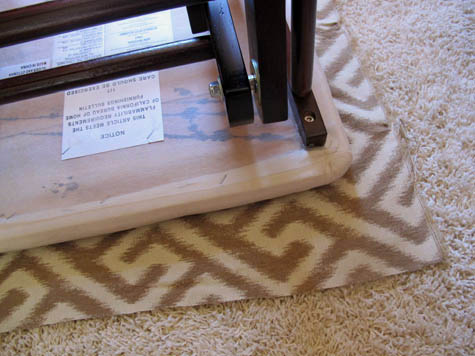
{2.} Begin stapling at the center of each edge, pulling taut (but not too tight to avoid puckering) as you go. Now you should have a staple in the center on each of the horizontal and vertical edges. Flip ottoman over and examine the final look. If you’ve made any errors, now is the time to pull those simple four staples up (or just one edge) and start over.
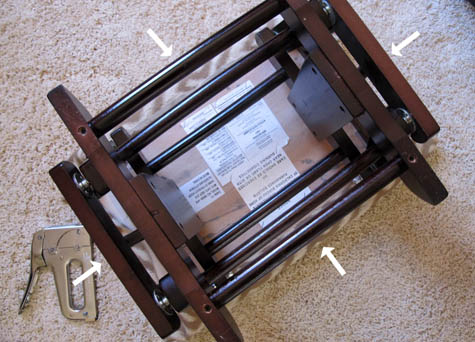
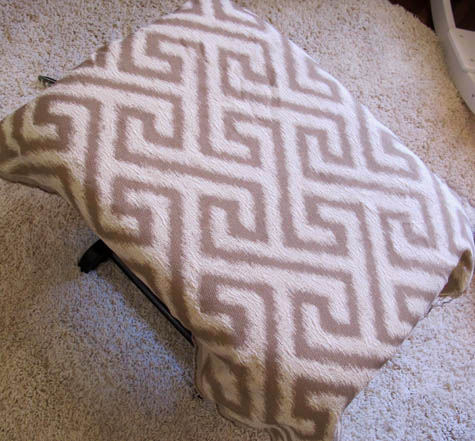
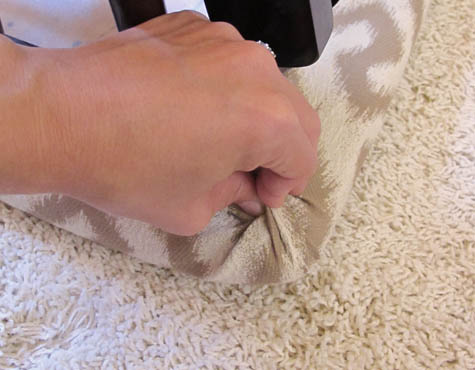
{3.} There are two basic ways to achieve clean corners: the first is a fold (similar to wrapping a package) and the second is a gather. For a gathered look, I recommend stapling in two parts. First, gather your fabric on the right side of the corner and staple gather in the center. Next, gather the left side and staple again (this second staple should slightly overlap the first right-side gather so that the corner looks like one large gather). Flip ottoman over and observe your corner. If it looks good to you, finish the next three.

The second gather is folded slightly over the first to create a clean corner that’s not going anywhere:
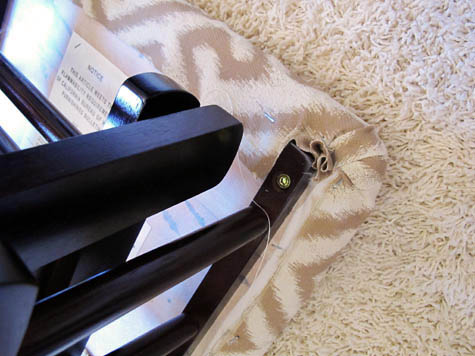
{4.} Now we want to fill in staples between the corners and center staple on each edge. You really want to make sure that your fabric is secure all the way around and always check for puckering before applying the next staple.

{5.} Your ottoman should be looking good! The last step is cutting any excess fabric from the edges.
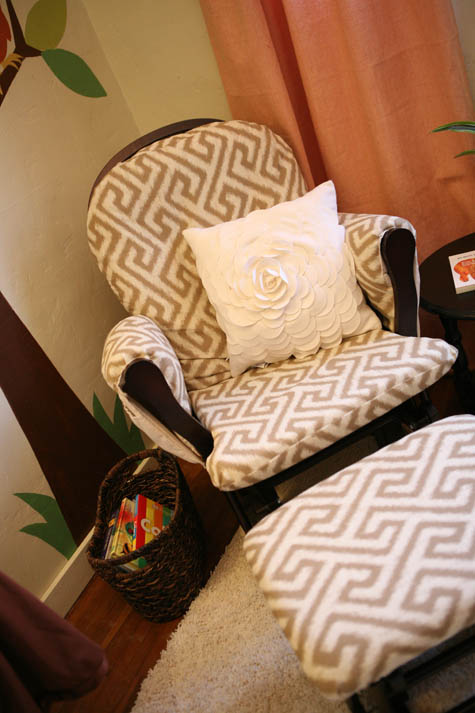
Yay for a matching ottoman! For the other half of this project (updating a standard nursery glider), check out this link.

More Project Nursery posts: baby clothing art, handmade butterfly mobile, diy crib skirt, basket liners part 2, basket liners part 1, the great glider makeover, sewing the curtains part 1, part 2, part 3, nursery fabric board, curtain fabric selection, rocking horse find, new pendant light, new sconce lighting, vintage wall art addition, changing table makeover, nursery wall striping tutorial, painted animal project, the initial inspiration board and the before picture posts.

Related Posts Plugin for WordPress, Blogger...

- posted on June 3, 2011 Filed Under: Crafty Solutions, DIY, Home, Liv's Nursery, Projects, Renovating Adventures, Tutorial Tagged With: Crafty Solutions, Decorating, DIY, Home, Nursery, Sewing, Tutorial

« Wardrobe Style Boards: Getting Ready for Summer!
*New Mama* Giveaway! »

Comments

  1. Hannah says

    June 13, 2016 at

    What kind of fabric did you use for this?

    • Morgan says

      June 16, 2016 at

      Hi, it was from Thibaut – you can read more about it here: http://www.pepperdesignblog.com/2011/04/01/project-nursery-a-cozy-place-to-rock/ :)

  2. Nina Designs says

    June 5, 2011 at

    Looks great! In a few days I’ll be sharing my little girl’s room, almost finished!

  3. Janelle says

    June 3, 2011 at

    Hi Morgan!
    This looks beautiful! And your detailed instructions are just perfect – thank you for sharing. The entire nursery makeover is nothing short of amazing!
    I really like the petal pillow against the chair fabric. Very cool, and such a comfy spot for rocking baby! ;)

  4. Janell Beals says

    June 3, 2011 at

    Perfect, love the fabric choice, makes the glinder a pretty addition to the room! Janell

Posted on Friday, June 3rd, 2011

Welcome to my little slice of the web where I practice finding family, career, homemade & inspired balance on a daily basis. This is where I capture my happy moments, and I'm honored that you're here to join us. Home + creativity + good eats + journaling + life as a working mom. Read more...

  • Email
  • Facebook
  • Google+
  • Instagram
  • Pinterest
  • RSS
  • StumbleUpon
  • Twitter

Search

Categories

Craft Projects CategoryCrafty Projects Good Eats & Recipes CategoryGood Eats Entertaining Ideas CategoryEntertaining Ideas Decorating Projects CategoryDecorating Style Boards CategoryStyle Boards Everything Holiday CategoryHolidays

Daily Dose

Favorite Posts

Dog Days of Summer: Craft Kits for Kids

Summer Craft Kits for Kids

August is a slower month for our family. Preschool summer school is out, dance lessons are taking a brief break for the month, our family vacation is

Our Double Stroller: Mountain Buggy +One Review

A Mountain Buggy +One Double Stroller Review

I'll preface by saying that this is not a sponsored review - we've found an awesome double stroller and we love it! Our Mountain Buggy + One has served

Wardrobe Style Board: A Work-From-Home Uniform

Wardrobe Style Board: A Stay-At-Home Mom Uniform | Cropped Light Jeans, Tan Sven Clogs, White Madewell V-Neck T-Shirt, Colorful Necklace, Gold Earrings | PepperDesignBlog.com

tan clogs | pocket tee | light jeans | gold disc earrings | colorful necklace It's not uncommon for people to come and go from our house all day long,

Happy 2nd Birthday, Taylor Rose!

Happy 2nd Birthday, Taylor Rose! An Infographic for My Girl | PepperDesignBlog.com

This weekend Taylor turned two. Taylor is such a bright, wonderful light in our lives. She is our funny, spunky little daughter that will do just about

How to Listen to Audiobooks on OverDrive

Intro to Audiobooks on OverDrive Public Library | PepperDesignBlog.com

Liv has developed a big interest in audiobooks as of late. One of my favorite ways for her to spend her 'quiet time' while Taylor and Marley nap is for her

Pistachio, Caramel & Sea Salt Chocolate Bars

Pistachio, Caramel & Sea Salt | Father's Day | PepperDesignBlog.com

Father's Day is not so far away, so here's an easy gift idea that can be made in advance or (literally) the night before. Homemade chocolate bars can be

Liv & Taylor-isms

Liv & Taylor-isms | Funny Things Kids Do & Say | PepperDesignBlog.com

Sometimes I capture something so funny/adorable/sweet that I can’t help but make note of it. Because Taylor is now expressing herself in full sentences, I

30 Things That I’ve Learned By 30

30 Things I've Learned by the Age of 30 | PepperDesignBlog.com

Today is my 30th birthday. I don't feel much older, but hearing that number roll out of my mouth feels as though I'm closing on a big chapter in my

Featured

Featured
VRBO San Diego Flying Bridge Vacation Rental cool toys for kids

Favorite Topics

Welcome to my little slice of the web where I practice finding family, career, homemade & inspired balance on a daily basis. This is where I capture my happy moments, and I'm honored that you're here to join us. Home + creativity + good eats + journaling. Read More…

  • Email
  • Google+
  • Instagram
  • Pinterest
  • RSS
  • StumbleUpon
  • Twitter
June 2011
MTWTFSS
« May Jul »
 12345
6789101112
13141516171819
20212223242526
27282930 

Copyright © 2025 · Foodie Pro Theme by Shay Bocks · Built on the Genesis Framework · Powered by WordPress