A Little of This & That… Renovating, Decorating, DIY Projects & Family

2nd & 3rd Trimester Style Boards: Dresses!

Hey mommas and future mommas, I’ve spent a little time on some reconnoissance work for you and I thought I’d share the results (rubbing hand sneakily together). I’m 38 weeks pregnant today, woohoo!! So this is about 3 months of research in the making.

Fan of maternity clothes I am not. Even though there comes a point where most pregnant women will not be able to avoid them (oh, 6-9 months in), they are often hard to adjust to because of limited styles, fit, price and comfort. I try to stick with everyday, off-the-rack clothing for as long as possible and when necessary, I size up. That works for me for the first trimester and most of the second (with the addition of this helpful little guy and long tanks).

Then comes the time when you must make room for that ever increasing watermelon in the tummy. It was winter during my third trimester with Liv so I learned to embrace maternity jeans, sweaters, thick leggings and all things comfy cozy (which I found surprisingly comforting). This time around though, this baby and I are experiencing warm, sunny weather all the way!

Favorite Maternity Dresses | Style Board | PepperDesignBlog.com

My solution? Dresses of the maternity and non-maternity type.

A simple, non belly cinching t-shirt dress was my go-to for most of the 2nd trimester.

For the 3rd? The fabulous maxi dress. Maxi dresses are generally flowy and with more fabric than the average dress so that there is plenty of room for a growing baby. Most maxi dresses will transition from pregnancy to post-pregnancy (before you’re back to your usual size) to post-post-pregnancy (when you can belt the waist and still pull off a slightly over-sized dress) easily.

My best secret? Find non-maternity maxi dresses that you know you’ll love even when not pregnant and have them altered to a low-high style (for a few dollars at your local dry cleaners) at a mid-calf length so that they fit the belly perfectly now and when the belly is eventually gone, will hit your legs at an even length. OR have a maxi hemmed at an even length at your knees to make the perfect maternity summer dress (the extra fabric from the maxi part is just the right amount to transition a maxi to a belly bumping comfy dress).

Favorite Maternity Dresses | Style Board | PepperDesignBlog.com

I live in the same five or six dresses these days, though I checked out quite a few before narrowing down to those favorites!

I’m basing my roundup of favorite finds off of my own stats (5’3″ on a good day, a buck and a nickle or dime pre-pregnancy + 35 ish pounds for the growing baby), but I think most women will find that these types of dresses are perfect for this time of the year pregnant or not.

I’ve tried on each of the dresses above and have kept only a handful (I basically wear the same few outfits and rotate) but all have past my raving reviews checklist (there were plenty that didn’t, too). Some are maternity, most are not. Some are my new go-to favorites (see the little heart icon) and most I ended up purchasing in navy or black (because as much as I like to think I’m just radiant in colors these days, that’s definitely not how I feel ;)).

Let me share the goods!
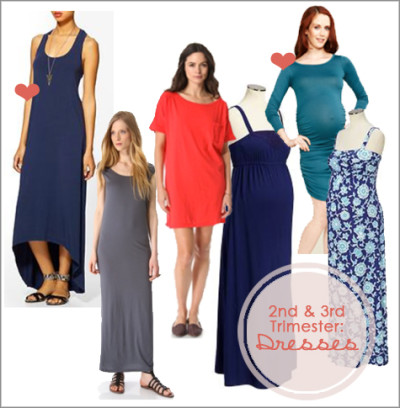
Style board 1:

Camilla Luxe Slub Maxi Dress: Comes with a rope belt but that was easy to remove. I kept this one and hemmed it to my mid calf – very comfy cotton dress for the farmer’s market or around the house.

Michael Stars Racerback Maxi Dress: This would be perfect hemmed at the knee and there is plenty of room for the belly when the elastic waist is pulled up a little above it. Very similar to the Lizia dress so I returned it.

SOLOW Linen Maxi Dress: It’s supposed to hit at the calf but on me it reaches the floor. I love it and it has been my go-to for most of spring!

ONE by Pink Stitch Resort Maxi Dress: Tight in the chest but perfect from there down. I imagine taking this dress on vacation post-pregnancy and wish it was made of cotton so it was a bit softer.

Gap Slub T Shirt Dress: The boatneck cut is very flattering on a very pregnant lady and this guy has become another go-to for me.

Lizia Luxe Slub Maxi Dress: My favorite dress for slightly nicer occasions. I pull the elastic waist up over the belly (will transition to a post-pregnancy dress really easily) and it’s not too tight or ill fitting.

Style board 2:

Splendid Always Hi Low Maxi Dress: Perfect 2nd and 3rd trimester dress with a flattering cut and made from comfy cotton. Here’s a similar one I just discovered, and check out that price.

Monrow Novelty Basic Cutout Dress: This guy was returned (could only keep my favorites) but I still loved the fit and the gal with especially toned arms – not me – will appreciate.

Velvet Fudge Dress: A t shirt dress that ended up going back when I found a cheaper version at Forever 21, but this guy is on sale now!

Old Navy ‘s Maternity Eyelet-Yoke Maxi Dresses: The price is too fantastic. Didn’t love the floor length style so altered it to my calves, now it’s a great dress to wear around town.

NOM Raleigh Dress: This one is hard to find these days but it often comes up on Gilt for as little as $25 (which is wear I snagged it). I’ve worn it to a few fancy events including a wedding and a Valentine’s Day date night and it always gets very kind compliments.

Old Navy’s Maternity Floral Maxi-Tube Dress: The cut for the dress was perfect (as I started to gain the bulk of my extra weight I became especially aware of the various neck cuts of dresses) but I didn’t love the pattern on me. I considered dying it for a while before returning ;).

There you have it, my 2nd & 3rd trimester dress roundup for all of the pregnant or soon-to-be pregnant mommas out there. OR for the lovely ladies without bellies who really dig maxi dresses (because I will definitely be sporting my non-maternity finds post-belly, too).

All Style Boards can be found right here

PPS Have you seen The Pregnant Husband? Best chuckle of the day.

An Ice Cream Social with Breyers

A couple of months ago Breyers reached out to me regarding their new line of ice cream sundae toppings. Would we like to test some out during their big debut of eight flavors? What a delicious offer. And a perfect excuse to throw a little spring ice cream social for Liv and her friends.

A Little Ice Cream Social | PepperDesignBlog.com

We picked a Saturday in late May and planned a get together around the arrival of this box (how fun is that packaging) which housed the various ice cream toppings:

A Little Ice Cream Social | Waffle Cone Cookies | PepperDesignBlog.com

On the day of the party, I pulled out my favorite fabric flags that I keep around for birthday parties and baby showers and made a couple of wooden block stands (a la this trick) for a festive and simple display.

A Little Ice Cream Social | PepperDesignBlog.com

A Little Ice Cream Social | PepperDesignBlog.com

It’s peony season, my favorite flower season.

When the kids arrived, we used mini patterned paper cups (left over from Liv’s 2nd birthday) to pass around scoops of vanilla ice cream. Then we popped open our tester toppings and tried them all out.

A Little Ice Cream Social | PepperDesignBlog.com

The new line includes strawberry, cherry and mixed berry fruit toppings, and caramel, chocolate and hot fudge (my favorite) sauces. Plus chocolate and rainbow sprinkles (Liv’s favorite).

We added a few healthy ice cream toppings such as strawberries, peaches and granola for the kiddies as well.

A Little Ice Cream Social | PepperDesignBlog.com

Still the sugar rush was a superb one!!

A Little Ice Cream Social | PepperDesignBlog.com

Made for an awesome ice cream social though! And we parents helped to make up the ice cream difference.

A Little Ice Cream Social | PepperDesignBlog.com

A Little Ice Cream Social | PepperDesignBlog.com

The parents agreed that the new squeeze pouches for the chocolate and caramel sauces were very genius. No sticky jars or sticky fingers. None of the toppings include high fructose corn syrup and the fruit purees are made with the real deal.

A Little Ice Cream Social | Waffle Cone Cookies | PepperDesignBlog.com

A Little Ice Cream Social | PepperDesignBlog.com

Using Oh Happy Day’s paper hat tutorial, some of the kids decorated little party hats for the ice cream social as well.

A Little Ice Cream Social | Waffle Cone Cookies | PepperDesignBlog.com

Since our crowd was mostly 2-3 year olds, the hats were near finished before the party with the exception of polka dots for the kids to add on their own.

A Little Ice Cream Social | Waffle Cone Cookies | PepperDesignBlog.com

A Little Ice Cream Social | PepperDesignBlog.com

They wore them for maybe a few minutes, but a cute little art project nonetheless. ;)

I attempted waffle cone bowls the night before using this recipe but ended up with cookies (which were much easier to form from the delicious buttery dough) instead. Since I didn’t have the right waffle cone tools on hand, I used our pancake griddle and grill press for the process.

A Little Ice Cream Social | Waffle Cone Cookies | PepperDesignBlog.com

A small roll of dough, a press on one side until brown, flip and repeat. They were yummy!

A Little Ice Cream Social | Waffle Cone Cookies | PepperDesignBlog.com

All in all, I would say it was an ice cream success.

A Little Ice Cream Social | PepperDesignBlog.com

Thanks, Breyers for a great reason to throw a party! PS you can read more about their toppings (and find a coupon for an in store purchase) here.

A Little Ice Cream Social | PepperDesignBlog.com

Bring on the summer sun! I’m ready for lots of outdoor parties and reasons to get together with friends. Maybe by a pool or at the beach next time? I’m definitely looking forward to my maternity leave :).

Liv’s Play Kitchen: The Break Down

Back as promised to share some of the details of Liv’s new kitchen!

Liv's Little Kitchen | PepperDesignBlog.com

I might be as excited about this project as she is (maybe even more so) because it was a bit of a labor of love. As Kevin comments to everyone that checks it out “and it took twice as long to build the little version than it did to build the big version”. Smirk, but true, true ;). Mine may not be as practical or useful or anywhere near the size of our actual kitchen (which Kev really did whip up in about three months), but I’m still pretty smitten with it.

Building the New Play Kitchen | PepperDesignBlog.com

It all started when I began to collect little bits of mini kitchen inspiration way back when Liv was waaaay too small to even know what a kitchen was. I just knew that one day I wanted to build one. It was that inner kid imagination – the channeling of building mini anything (which I did all the time as a wee one) to be as realistic as possible. Did you ever build your Puppy Surprise stuffies a pretend house in your desk at school? Every girl in my kindergarten class would be raising her hand. Or how about a lair for your GigaPet? Or the perfect dollhouse? Those were the days.

My version of an adult dollhouse (and I guess that makes Liv my little doll):

Liv's Little Kitchen | PepperDesignBlog.com

Inspiration in hand, I thought I might try and convert an older media unit into a cool kitchen. Or perhaps a left over set of garage/kitchen cabinets. Anything rescued and transformed from a thrift store or the Habitat for Humanity Re-Store would be awesome. But since I had a very specific spot in mind for the little kitchen (the end of our island in our kitchen), measurements never quite worked out. And the prices weren’t super either.

Building the New Play Kitchen | PepperDesignBlog.com

Enter a little trip to Ikea for browsing and the TROFAST toy storage unit which checked out in price and size. The price for the pine version was a little on the heavy side, while the white particle board version was more my budget. But I was worried about applying paint to the particle board (and it lasting a while without chipping) and so decided to play it safe with the pine.

littlekitchen_ikeacollage_500

(We have fun at Ikea.)

Assembling was tons of fun in that special Ikea way (har, har). Here I am at Christmas time tackling this beast. As with most Ikea products, I’m pretty sure I had to assemble twice and disassemble once before it was put together correctly :).

Building the New Play Kitchen | PepperDesignBlog.com

When choosing a color, an orangey-red kept coming back to me again and again. I finally color matched a pomegranate illustration from one of my favorite Rifle calendars that hung in the kitchen at the time (but with actual paint and not spray paint, wouldn’t that have been nifty?).

Building the New Play Kitchen | PepperDesignBlog.com

That burnt orange is definitely a favorite accent of mine in our mostly green kitchen. It pops up here and there.

Building the New Play Kitchen | PepperDesignBlog.com

The counter is from the VIKA desk collection at Ikea and fit the storage unit lengthwise perfectly. No chopping required. We did have to cut it down about 3″ or so in the width but for $5.99 you just can’t beat it. Five months into life it’s experiencing some wear and tear which is a bummer (but what can you expect from particle board).

Building the New Play Kitchen | PepperDesignBlog.com

The TROFAST shelves (which were made to fit the little slots of the toy storage unit) covered the front of each compartment of the toy unit near perfectly so we converted one into a door that opened like a cabinet and one that opened like an oven door with two hinges each.

Building the New Play Kitchen | PepperDesignBlog.com

Liv's Little Kitchen | PepperDesignBlog.com

The oven door itself was cut to add a little window so you could see inside of the oven, then we lined it with clear plastic from an Ikea frame.

Liv's Little Kitchen | PepperDesignBlog.com

We drilled and installed three little silver knobs (from the hardware store) so that you could ‘turn on’ the stove.

Liv's Little Kitchen | PepperDesignBlog.com

Speaking of stove, creating the range was as simple as taping off a square on the top of the countertop and spray painting it silver. I’m a big fan of using garbage bags as mini drop cloths for projects just like these, they’re easy to reuse for an entire project but you can throw them away (with all of your empty paint cans and trash in them) when you’re done. I’ve taped off the entire left hand side of the counter with a trash bag here.

Building the New Play Kitchen | PepperDesignBlog.com

The Junkman on Etsy is my go-to guy for unusual wood cuts and he came through for me with two sets of plywood circles, one 4 1/2″ and one 5 1/2″. I spray painted the larger circle black and topped it with a silver spray painted smaller circle, and then a small wooden X shape in black again to complete the burners.

Liv's Little Kitchen | PepperDesignBlog.com

But that was actually my May stove top fix. I actually attempted to use furniture moving discs (from Joann’s) initially:

Building the New Play Kitchen | PepperDesignBlog.com

Peeling paint + pretend food consumption = bad. Bummer. The newer solution is 10x better! and cuter:

Liv's Little Kitchen | PepperDesignBlog.com

I stole the sink idea from most play kitchen builders that have gone before me: measure a metal mixing bowl (with a lip) to size, cut out to fit in your countertop. The lip on the metal bowl should keep it in place.

Liv's Little Kitchen | PepperDesignBlog.com

I found the bar sink on either Amazon or eBay, can’t recall (but both are great for tracking one down) for $15 ish.

Building the New Play Kitchen | PepperDesignBlog.com

Let’s talk about the oven for just a second. I painted the inside of the third compartment of the TROFAST unit black and we cut down one of the TROFAST shelves into four skinny pieces to hold the oven racks.

Building the New Play Kitchen | PepperDesignBlog.com

A little wood glue (be sure wipe off the excess that squeezes out) ensures they’re stuck in place.

Building the New Play Kitchen | PepperDesignBlog.com

Building the New Play Kitchen | PepperDesignBlog.com

I added a little push light to the inside of the oven just for fun, though I’m sure it’s going to run out of batteries soon since Liv loves to keep it on all. of. the. time.

Liv's Little Kitchen | PepperDesignBlog.com

The oven racks themselves are from a two-tiered cooling rack that I found on Amazon and cut the legs off of, I then glued (with a glue gun) the racks directly to the little black shelves.

Liv's Little Kitchen | PepperDesignBlog.com

The backsplash was a recent addition. As the little kitchen sat in its spot, I kept picturing something that would give the cabinet unit a little height and a fun backsplash kept coming to mind. I trolled eBay for a bit and found this lovely green, mustard yellow and orange 1″ tile and was able to talk the seller down to a pretty sweet price (I can’t really imagine this tile in someone’s modern bathroom or kitchen… but it’s perfect for my little one!).

Building the New Play Kitchen | PepperDesignBlog.com

Using a piece of plywood cut to size as my base, I adhered, grouted and sponged my tile into place.

We had left over grout around the house but if you’re not wanting to buy a bulk bag from a home improvement store most craft stores sell small bags for mosaic projects. A little water plus a little grout plus a sponge brush (my favorite tool for small projects and if you don’t have actual tile tools lying around).

Building the New Play Kitchen | PepperDesignBlog.com

Use thin set (or even glue ;)) to attach tile (with mesh backing) to plywood. Apply a generous amount of grout to your tile surface while also really pushing that grout into the cracks between your tile (watch it as it begins to dry so that you can catch cracks in your grout and add a little more).

Building the New Play Kitchen | PepperDesignBlog.com

Use fingers when necessary.

Building the New Play Kitchen | PepperDesignBlog.com

Then begin to slowly wipe away the grout from the tops of the tile pieces while the grout is still wet. A sponge, towel or even paper towels can be great for this.

Building the New Play Kitchen | PepperDesignBlog.com

Building the New Play Kitchen | PepperDesignBlog.com

I then added the backing to the back of the kitchen (not the countertop, which is particle board, but the actual pine unit):

Liv's Little Kitchen | PepperDesignBlog.com

Last but not least are the TROFAST storage bins and the dowel + curtain that we assembled with iron-on hem tape for the door to the middle unit:

Liv's Little Kitchen | PepperDesignBlog.com

The cute floral fabric is a remnant of mine from my fabric bin, but I’m almost positive it’s from Joann’s. The dowel worked out well because it fit perfectly into the top notch of the toy unit (the notch for those green bins) that was already built into place.

Liv's Little Kitchen | PepperDesignBlog.com

Finished!

The only missing component? One happy little chef:

Liv's Little Kitchen | PepperDesignBlog.com

Liv's Little Kitchen | PepperDesignBlog.com

And one happy momma who is so happy with how it turned out.

Liv's Little Kitchen | PepperDesignBlog.com

Happy weekend!

Related Posts Plugin for WordPress, Blogger...