A Little of This & That… Renovating, Decorating, DIY Projects & Family

A Butterfly & a Cocoon…

Liv’s Halloween calendar has been quite booked (so goes the life of a preschooler?) and we finished up her costume an entire week before the big day! That’s record setting in this house (says the one that is usually sewing/gluing/glitterizing as people are coming over to join us for trick-or-treating on the 31st).

Halloween DIY Butterfly Costume | PepperDesignBlog.com

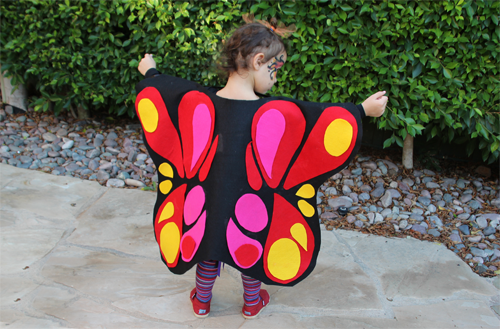
This little butterfly attended a neighborhood Halloween event just yesterday and so I snapped some photos of her while it was still bright and sunny outside.

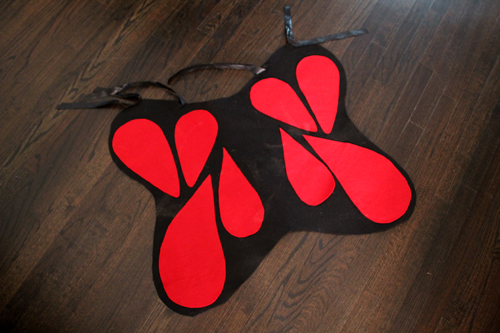
The costume itself was very easy to make. We bought the felt from a local fabric store that sells felt by the yard and used fabric spray glue to adhere shapes to the wings. The wings are tied on to Liv’s wrists and around her neck (like a cape) with strips of ribbon stitched in place.

Halloween DIY Butterfly Costume | PepperDesignBlog.com

Halloween DIY Butterfly Costume | PepperDesignBlog.com

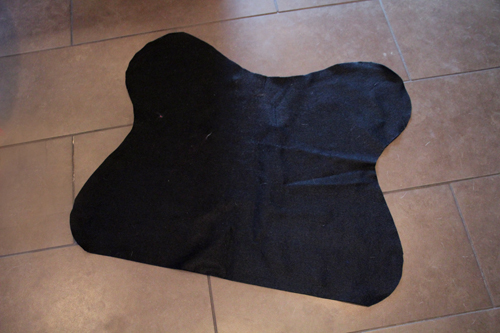
The underside needed a bit of color but not as much detail as the exterior wings, so I added just a few red tear drop shapes inside.

Halloween DIY Butterfly Costume | PepperDesignBlog.com

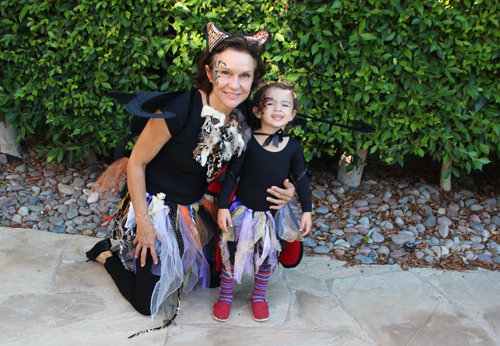
Here’s Liv and her nana – who made matching skirts for the two of them – just before our Sunday afternoon outting.

Halloween DIY Butterfly Costume | PepperDesignBlog.com

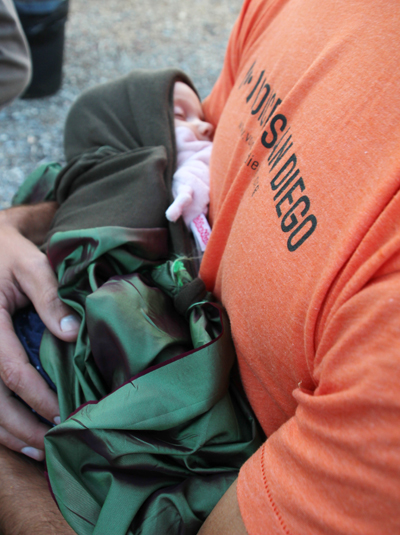
And Taylor? Why a cocoon, of course!

Halloween DIY Butterfly Costume | PepperDesignBlog.com

I found the idea for the sibling costumes over here (originally found here) – thanks for the inspiration, Leslie! I will have to make Taylor’s little outfit (all that wrapped fabric, that is) a little more secure before Halloween night ;). She broke her legs through right away.

Halloween DIY Butterfly Costume | PepperDesignBlog.com

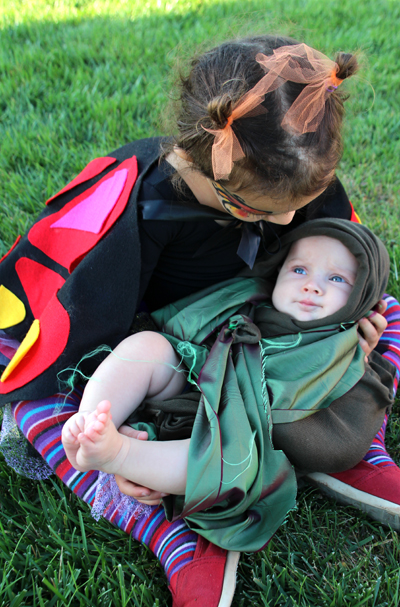
See that expression? She’s saying ‘puhlease, mom. this is my first ever halloween costume?’. Alright, back to the drawing board I go.

Check out a round up of Halloween ideas posted previously on the blog, and guess whooooo Liv was last year ;).

PDB Has a New Look!

What do you think? This redesign has been in the works for a while now and I’m so happy to finally share it with you all! It’s not all set in stone just yet – I’ll be messing with pieces of it here and there, but for the most part you are looking at the major facelift (that has been minutely scrutinized for months ;)).

I’ve added a house tour infographic to check out the before and afters of each renovation project, an easy-to-sort categories section to find projects related to holidays or entertaining, and a ‘favorites’ column of all posts that I love most. More neat features to come soon…

Our Redesign is Live! | PepperDesignBlog.com

Bop around a bit and check it out! And if you run into any error messages, shoot me an email: morgan at pepperdesignblog dot com or leave in the comments here so that I can resolve it asap. Thanks! and hope you enjoy!

Good Eats: Maple Oat Bars

The secret to a great dessert bar is in the crust. It’s that buttery, sugary, slightly crunchy, very caramelized, melt-in-your-mouth crust that makes a dessert bar deserving of bar status. Then you can top it with whatever you’d like – oatmeal and white chocolate chips, corn syrup and pecans, apples and brown sugar, apricots and honey…

I wasn’t planning on sharing this recipe because the photos turned out a little meh (most are from my iphone – with the exception of that first one – I was in a hurry the morning of our pumpkin patch trip) but I received a few requests, and so your wish is my command.

Maple Oat Bars | PepperDesignBlog.com

Maple Oat Bars
m

Crust:

1 1/2 sticks cold unsalted butter, cubed
1 1/2 cups all-purpose flour
2/3 cup brown sugar
1/2 teaspoon salt

This is a pretty standard crust recipe. Lots of cold butter, a matching amount of flour, brown sugar, a pinch of salt. I usually run my flour through a sifter before adding it.

Maple Oat Bars | PepperDesignBlog.com

You can use a food processor to cut the chunks up, but I often just break everything together with my hands. Line a square baking sheet (a 9×13 brownie pan will do) with foil and cooking spray, then press your crust into the bottom of the pan.

Maple Oat Bars | PepperDesignBlog.com

Bake for 15-20 minutes at 350 degrees or until the crust is golden brown and cracking.

Maple Oat Bars | PepperDesignBlog.com

Topping:

1 stick unsalted butter, softened
1 cup brown sugar
2 cups oatmeal
Pinch salt
Pecans (optional)
Maple syrup

In a separate bowl, crumble together topping ingredients with exception of maple syrup. Lightly pat onto baked crust.

Maple Oat Bars | PepperDesignBlog.com

Bake for 25-30 minutes. When the bars emerge from the oven, evenly sprinkle with a light amount of maple syrup. Let cool.

Maple Oat Bars | PepperDesignBlog.com

Cut into squares and enjoy!

Maple Oat Bars | PepperDesignBlog.com

Maple Oat Bars | PepperDesignBlog.com

Try this recipe with chocolate chips, macadamia nuts, pecans, cranberries, you name it. This crust is the perfect foundation for pecan bars if you mix corn syrup, brown sugar and pecans together as your topping. It’s all soooo good. Happy fall baking!

More good eats & recipes found here.

Related Posts Plugin for WordPress, Blogger...