A Little of This & That… Renovating, Decorating, DIY Projects & Family

$.13 Christmas Cards {and Downloads)

We’ve been slow to get our Christmas cards in the mail. Even though we did something really out of the ordinary this year and, on a whim, worked with a professional photographer to capture some family shots – back in early November – I still haven’t gotten it all together card-wise. We might order cards to mail out, I might work with a local print shop… I have no idea at the moment.

But until then, I’ve been playing with diy Christmas cards. Because they’re super cost-effective and super easy to make. I’ll share the process today so that if you’d like to create your own $.13 Christmas cards you can.

Christmas Card Overlays | DIY Cards | PepperDesignBlog.com

Costco in our neighborhood prints photos for $.13, but they might be $.09 or $.15 depending on your local Walgreens/Target/Sam’s Club. And if you mount them on paper like I did for my samples they’ll be just a bit more.

So here’s how these easy diy Christmas cards work. I’ve created five holiday overlays to download – these are .png files that you can download to your computer and then ‘overlay’ on top of your family photos following these steps through the totally awesome and free online photo editor program, Pixlr.

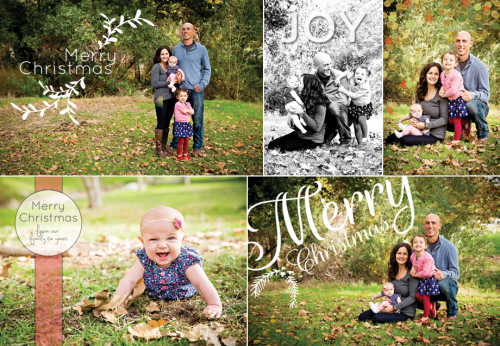
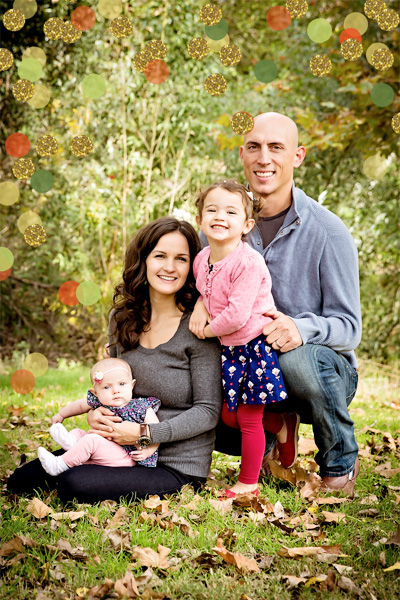
Here are my five overlays:

Christmas Card Overlays | DIY Cards | PepperDesignBlog.com

They can be adjusted for horizontal or vertical photos, I’ll show you how I did that as well.

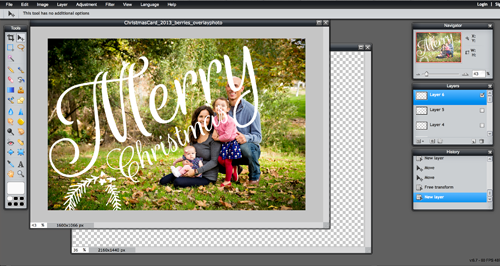
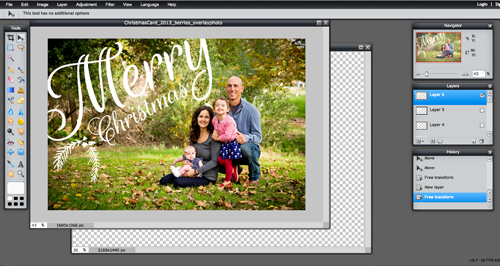
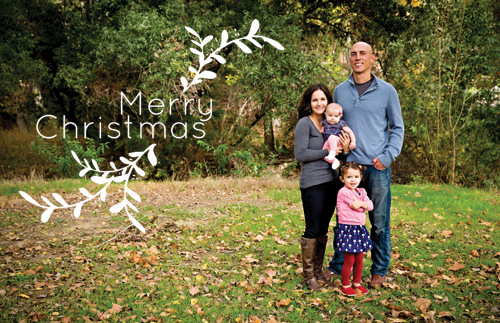
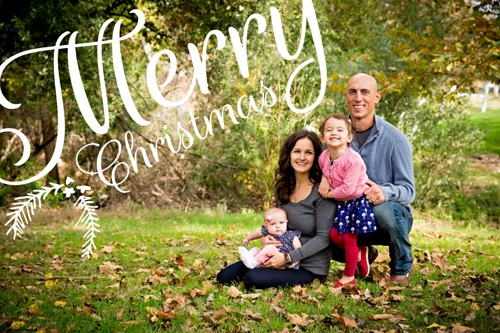
First things first, here’s what the photo looks like with the overlay on top:

Christmas Card Overlays | DIY Cards | PepperDesignBlog.com

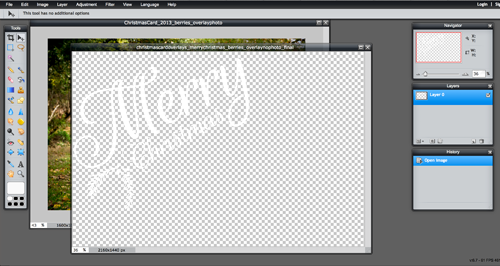
But here’s what you’ll be downloading:

Christmas Card Overlays | DIY Cards | PepperDesignBlog.com

This is so easy. No editing programs to download, nothing to buy. Pixlr is a free tool that you use right on the internet.

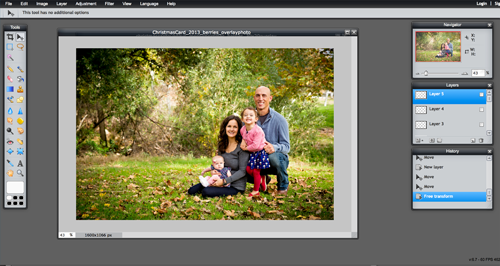
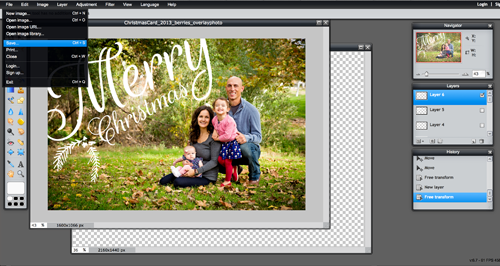
Once you’ve saved the overlay to your computer, open Pixlr in a new tab in your browser. Go to File | Open and select your family photo (I’m using my ‘Merry Christmas Holly’ overlay as the example). You’re using the full size photo straight out of your camera (don’t resize to a 4×6 or 5×7, your printing company of choice will do that for you).

Christmas Card Overlays | DIY Cards | PepperDesignBlog.com

Then go to File | Open and select the downloaded overlay off of your computer. See the grey and white boxes in the background? That means that the background is transparent with the exception of the white lettering.

Christmas Card Overlays | DIY Cards | PepperDesignBlog.com

Now go to Edit | Select all to select the entire canvas of your overlay.

Christmas Card Overlays | DIY Cards | PepperDesignBlog.com

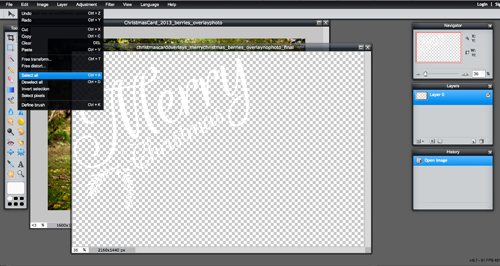
Then Edit | Copy to copy the white lettering.

Christmas Card Overlays | DIY Cards | PepperDesignBlog.com

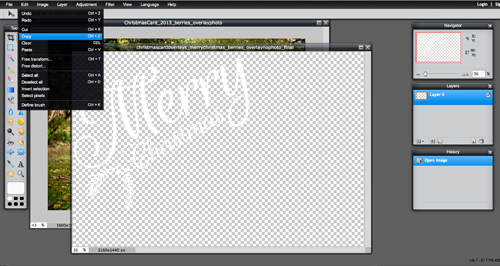
And moving back to your family photo, Edit | Paste.

Christmas Card Overlays | DIY Cards | PepperDesignBlog.com

Christmas Card Overlays | DIY Cards | PepperDesignBlog.com

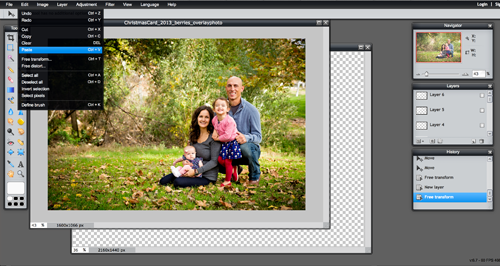
Now the overlay might be an odd size for your picture, so you can ‘transform’ it by going to Edit | Free transform.

Note: These overlays are big – you’ll want to downsize most of them to fit your photo but not upsize (or make them any bigger) or they’ll be pixelated. If the overlay is too small for your photo, first resize your photo to an 8×10 (or something still larger than 4×6) and then try pasting the overlay again.

Christmas Card Overlays | DIY Cards | PepperDesignBlog.com

Resize, rotate, move the overlay around until it looks just right (this is why these overlays can be used on vertical photos easily as well).

Christmas Card Overlays | DIY Cards | PepperDesignBlog.com

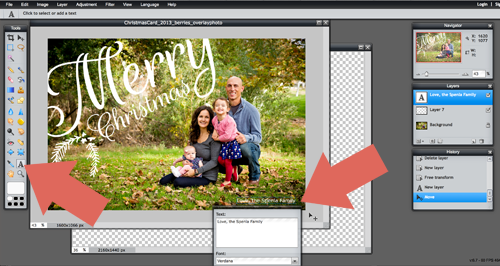
You could also use the built in text tool to customize your card with your names.

Christmas Card Overlays | DIY Cards | PepperDesignBlog.com

Now it’s time to save. Go to File | Save.

Christmas Card Overlays | DIY Cards | PepperDesignBlog.com

Select the very highest quality (default is .jpg and that’s just fine for our purposes).

Christmas Card Overlays | DIY Cards | PepperDesignBlog.com

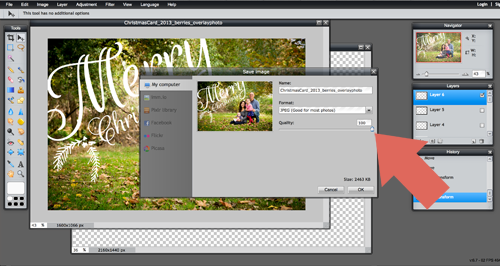
And upload to your favorite printing store (I chose Costco and printed with a white trim – which is an option with most photo printing companies). You might want to run a batch of one or two before printing all just to make sure they turn out okay. I went back to Costco twice before they were just right – but it’s totally worth saving $100.

Christmas Card Overlays | DIY Cards | PepperDesignBlog.com

Here are the overlays to download (download by right clicking the link that says HERE and not the photo with the example).

Christmas Card Overlays | DIY Cards | PepperDesignBlog.com

Christmas Confetti overlay download HERE.

Christmas Card Overlays | DIY Cards | PepperDesignBlog.com

Christmas Card Overlays | DIY Cards | PepperDesignBlog.com

Merry Christmas Garland overlay download HERE.

Christmas Card Overlays | DIY Cards | PepperDesignBlog.com

Joy Lettering download HERE.

christmascardoverlays_christmasbadge_500

Christmas Badge download HERE.

Christmas Card Overlays | DIY Cards | PepperDesignBlog.com

Merry Christmas Holly overlay download HERE.

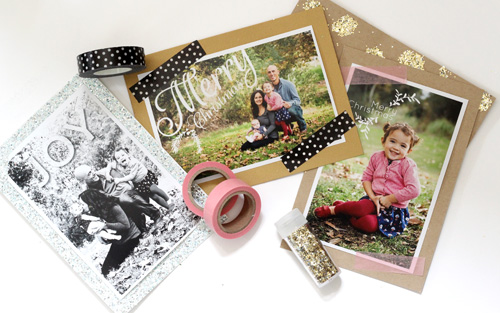
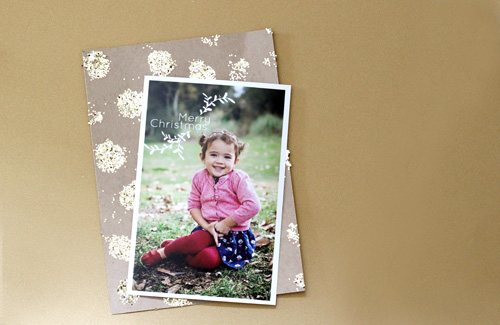
If you want to go above and beyond basic printing, you could mount your photos on pretty paper. Here are a few of my favorites:

Christmas Card Overlays | DIY Cards | PepperDesignBlog.com

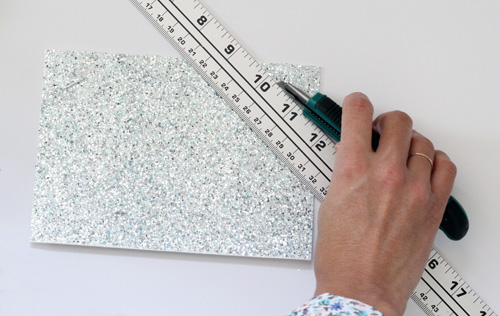
Glittery blue for our Joy photos (to attach the photo to the cardstock I made two little slits in the corners).

Christmas Card Overlays | DIY Cards | PepperDesignBlog.com

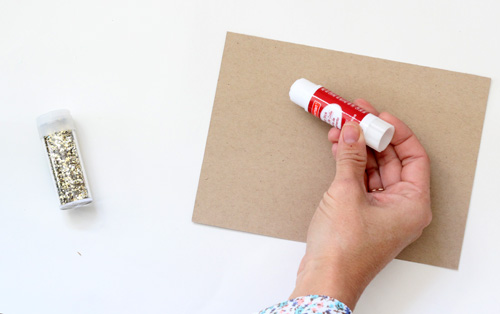
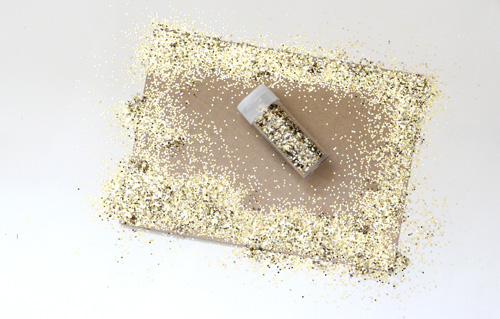
For a fun glitter background, I dotted brown cardstock with a glue stick and shook glitter over the wet glue.

Christmas Card Overlays | DIY Cards | PepperDesignBlog.com

Christmas Card Overlays | DIY Cards | PepperDesignBlog.com

Christmas Card Overlays | DIY Cards | PepperDesignBlog.com

Christmas Card Overlays | DIY Cards | PepperDesignBlog.com

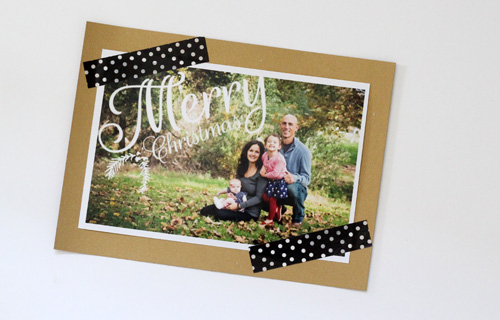
Or a basic washi tape is fun!

Christmas Card Overlays | DIY Cards | PepperDesignBlog.com

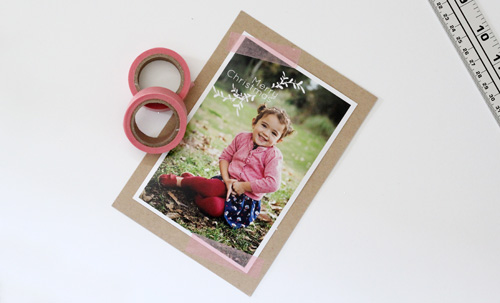
The black polka dot (from Michaels) might be my favorite.

Christmas Card Overlays | DIY Cards | PepperDesignBlog.com

There you have it! $.13 Christmas cards for the whole fam. Shoot me an email (morgan at pepperdesignblog dot com) or leave a message in the comments if you have any questions. I’ll make updates to this tutorial as I hear feedback.

Now, back to my Christmas cards I go :).

PS That photographer I mentioned? That’s Stefanie of Joie de Vivre Photography. She’s amazing and does very reasonably priced ‘mini sessions’ for the whole family. We’ll definitely be working with her again!

Girls’ Room Update: Swing Arm Wall Sconces

I know it’s been a very long, long while since I’ve updated you on the nursery (and, history is repeating itself, this room might actually be finished when Taylor is six months old just like Liv’s nursery). The three pieces of the puzzle that have been holding me up are: roman shades for the three windows, fabric for the window seat and light fixtures for the bookcases. I’ve struggled with these decisions (because all three are investment pieces) for months and months, and finally let it go. I decided that when the timing was right, the solutions would be found.

I’m happy to report that I’m almost there :).

New Nursery Bookshelves | PepperDesignBlog.com

I found great fabrics for the roman shades and the window cushion, and I’m working on our lighting fix now.

What I would really love to do is to put swing arm wall sconces inside the bookshelves as reading lights for the new window seat nook, and as additional lighting in a space that has only one over head light (and no can lights just yet).

Swing arm sconces? lovely.

Girls' Room Bookshelf Sconce Ideas | PepperDesignBlog.com

1 | 2 | 3 | 4 | 5

My thought is that I’ll mount them just inside of the bookshelves, like this:

Girls' Room Bookshelf Sconce Ideas | PepperDesignBlog.com

1 | 2

But finding those lights has been tricky. Here are a few of my favorites (picture them all in brass):

Girls' Room Bookshelf Sconce Ideas | PepperDesignBlog.com

School House Electric | School House Electric 2 | Unknown image from Tumblr
Wayfair | Joss & MainUrban Outfitters | Shades of Light | House of Troy

But most are in the price range of $200-350 each, with the only exception really begin the eyeball sconce from Urban Outfitters. I actually ordered two to give them a try, but they are too stubby for the bookcases (and the wide window in between). The space really needs a light with a swing arm to help span a bit of that gap. PS if you are interested in those UO sconces – I’m past my return date! Make me an offer via email.

So for the last six months or so I’ve been deal scanning, flea market scanning, craigslist & ebay scanning…

And then look what I found!

Girls' Room Bookshelf Wall Light | PepperDesignBlog.com

The Angelo Cooper Contemporary Wall Lamp (say that three times). For $68 each. It’s a swing arm sconce, it has an eyeball-style head, it fits the bill.

girlsroom_sconces_beforepainting_500

White is okay, but for these lights to show up against an all white bookshelf and all white window trim, they’re going gold.

girlsroom_sconces_taping_500

Rust-oleum Metallic did the job perfectly. Not too brassy, not too shiny, not too dull.

Girls' Room Bookshelf Wall Light | PepperDesignBlog.com

To get a clean, non-dripping finish, I taped every little piece of this guy that wasn’t going gold (the front and back of the glass, black cord and electrical cords at the base) and then slowly sprayed the lights about 10″ above them with smooth, even arm movements in very thin layers. To coat everything, I probably applied five-six layers in total. The key for me with spray paint is go very light, and then to reapply.

Girls' Room Bookshelf Wall Light | PepperDesignBlog.com

Now I hand it over to the electrician! The installation of these guys is just past my willing diy level (since they have to be mounted just right on wooden bookshelves that I love so dearly). Will keep you posted.

PS all girls’ room transformation posts right here. It’s all coming together!

2013 Holiday Gift Guide: For the Ladies (Part 2)

Happy Monday and welcome back from the weekend. Ours was a little bit relaxing, a little bit busy. We found our Christmas tree Saturday and began decorating the house, all while listening to a little classical Christmas music and enjoying a few of these. (Warning: they’re terribly addictive). Kev talked me into what I thought was a Charlie Brown tree of sorts while we were at the Christmas tree farm, but it turns out that the odd ball of a lengthy, gappy tree is sort of growing on me (when we initially brought it into the house it was three feet too tall). I’ll share when it’s finally up and you can tell me what you think.

Today I’m sharing part 2 of my gift guide for the ladies! Here’s a link to part 1, and a link to the gift guide series on the blog just for fun.

2013 Holiday Gift Guide: For the Ladies | PepperDesignBlog.com

bamboo bath caddy | chevron iPhone case | two tone block planter
pendant necklace | ‘Rita’ painting | instagram magnets
chevron latte mug | hand printed vine linens

I’m starting this guide off with what I secretly hope will be a diy present from the mister (hint, hint) – but one that would be an equally sweet, purchased treat for any lady. What am I referring to? That beautiful bamboo bath caddy up there in the left corner. So simple and yet so perfect for a book and a glass of wine, no? Kevin is fond of working with various planed raw planks that we find at the lumberyard, maybe he can find one that is about, oh, 3’x1′ to go with that great bathroom that he built.

Following along the planter craze that I’ve started in our household, I have a few standing planters that I’m eying this season – including this wood + white version that feels both very organic and very fresh. Speaking of fresh, (but in a different way) how pretty is this beautiful ‘Rita’ painting?

If you’re searching for a finicky friend, a simple long necklace like this guy is a win (love the unusual shape of the pendant). I’m still a huge fan of the wallet + phone covers but I couldn’t resist this chevron case a gift idea.

I discovered Stickygram earlier this year and have some magnet ideas in the hopper (made from Instagram photos – very easy) for Liv. This chevron latte mug is more of what I have in mind for a close girlfriend (would be great paired with a pound of my favorite roasted coffee beans). Possibly a diy project like this?

I am also a sucker for all things block print. Both this hand printed linen vine design and this charcoal dots version have landed on my boards this year. Linens in general are beautiful and practical gifts for friends, family and neighbors. Pair with a favorite cookbook for something extra special

2013 Holiday Gift Guide: For the Ladies | PepperDesignBlog.com

hand carved bowl | dance 2 printsequined pillow cover
mint & gold necklace | porcelain bird feeders | chevron pullover sweater
plaid button down | charcoal dots handprinted napkinsbooties

Our neighbor (the one who built the girls’ awesome bookcases) makes beautiful wooden bowls and vases out of stumps and other found woods. Sometimes Liv and I stop by his workshop (which is just two houses down) on the walk to preschool in the mornings and I’ve come to appreciate the beauty in the natural wood pieces. This piece isn’t by him, but a hand carved bowl like that one would make a beautiful gift for a family member for displaying or using.

Speaking of displaying, I recently picked up a sequined gold pillow that looks a lot like this one from Target and love how it sparkles on our guest bed year round – but especially how it looks on the couch this time of the year next to our Christmas tree. I can’t seem to find my exact pillow online.

Art is a gift that will always be loved – this print is a colorful (but quite generic) gift idea that I think would be a favorite by many. Another crowd pleaser? The sculptural porcelain bird feeders with their bright pop of color on the inside. I would love, love two for the pepper tree in our backyard.

I personally bought myself a two strand (contact the etsy designer for a custom listing) version of this mint & gold necklace last year and I wear it all of the time. I can vouch for how beautiful and fun it looks in person.

Raspberry red and plaid are two colors (patterns? styles?) that I’ve been leaning towards. This button down and this chevron pullover sweater are perfect. Speaking of style, how great are these ankle booties? A versatile color that can be worn with black, brown and everything in between.

*****************************************************************

And there you have it! That concludes four inspiration boards of thoughtful and unique gift ideas for the ladies in your life. Be they sisters, friends, the babysitter… I hope these help when hunting down something special for that special someone.

Here’s that link to the first two boards (part 1) and again a link to all of the gift guide series previously posted on the blog. Happy Monday.

Related Posts Plugin for WordPress, Blogger...