A Little of This & That… Renovating, Decorating, DIY Projects & Family

An Easy(ier) A-Frame Tent

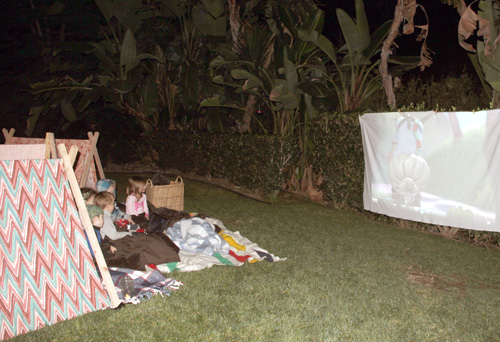
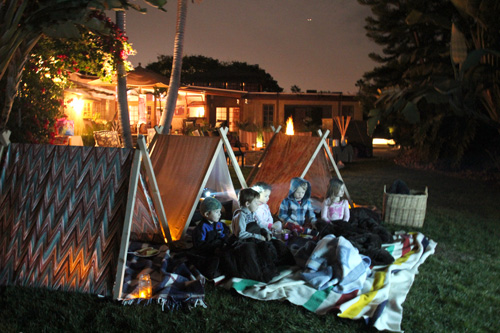
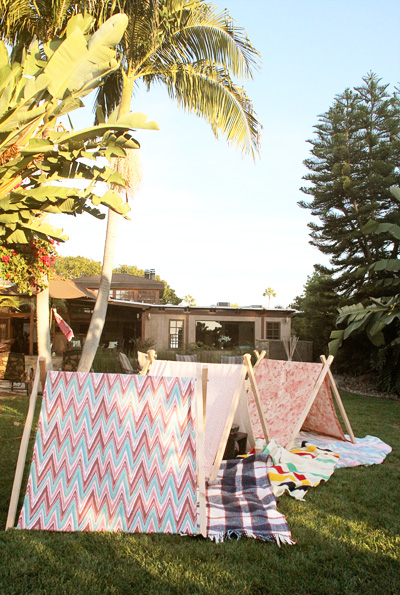
Adorable a-frame tents have been all over Pinterest and the general blogosphere for some time, so I’ll admit that I didn’t reinvent the wheel when scheming a fun tent idea for Liv’s 3rd ‘Camping’ birthday.

Liv's 3rd Camping Birthday | PepperDesignBlog.com

As I had mentioned last week, I was originally planning on a larger lean-to sort of sheet structure so that all of her little friends could watch an outdoor movie snuggled together – but plans fell through for that idea the day of the party – eek – and I turned to Pinterest and Google to search out a simpler solution. (Turns out running lengths of rope and draping sheets is not as easy as one would think).

Liv's 3rd Camping Birthday | PepperDesignBlog.com

Luckily, I discovered that a-frame tents are super simple! A quick search led me to a tutorial by A Beautiful Mess (a blog I already love), complete with a cut list that I could text to Kev as he was headed out the door to the home improvement store. I won’t repost it here but I’ll give it an overwhelmingly relieved mom smile and two thumbs up for needing just a mallet (or hammer) and drill to assemble. Sand paper if you’re feeling detailed.

An Even Easy(ire) A-Frame Tent | PepperDesignBlog.com

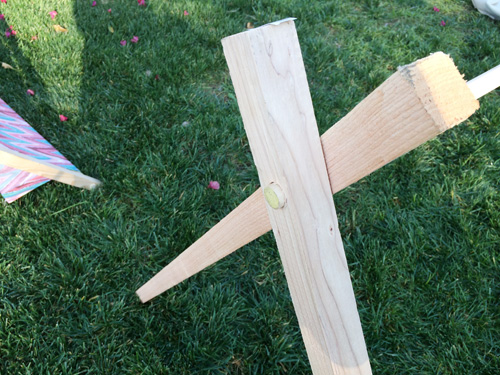
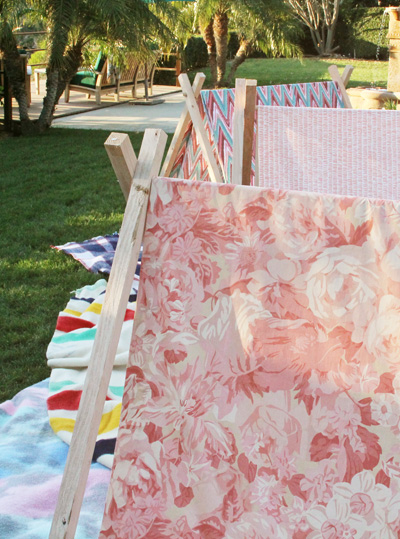
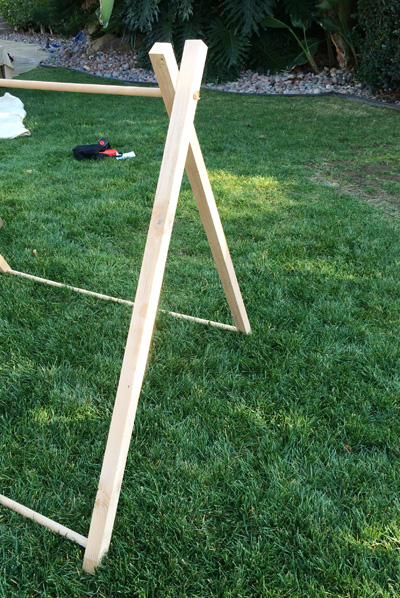
Screws, nails and glue were not involved in this diy. In fact, even knowing that those materials were not required made this project feel totally approachable and attainable in the couple of hours I had allotted for it. And we beat that record by about 90 minutes. Kev collected the supplies for me while I was running out to get fabric from our local discount store. We made three tents so he picked up 9 48″ dowels and 12 pieces of 2x2x48″ wood (if you can’t find them in that size at your hardware store, most will make that quick cut at no cost). That’s 3 dowels to span the gap between 4 pieces of 2×2″ wood that serve as the sides of each tent (note: the tutorial we were following called for 1×2″ wood but 2×2 is what Kev quickly found and it worked out great – I’m sure it’s even sturdier).

Each piece of 2x2x48″ piece of wood received two drill holes – one about 2″ up from the bottom and the other about 6″ down from the top. A dowel secured two pieces of wood together at the top to form a lopsided ‘x’, and the bases were held together by two dowels running to the base of another ‘x’. All dowels were ‘tapped’ into place through the lengths of wood with a hammer (or mallet).

An Even Easy(ire) A-Frame Tent | PepperDesignBlog.com

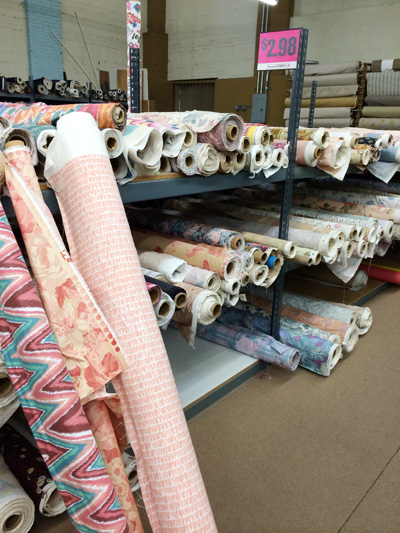
Twenty or so minutes after sending Kev the cut list, I found myself in the 80’s department of my favorite local discount fabric shop (a converted old movie theater just down the street) with a plethora of choices. I remember wandering into this shop when I first moved to San Diego six years ago and thinking that the tables and tables of discounted fabrics were already to outdated for quality use. When would I use a pastel floral print??

An Even Easy(ire) A-Frame Tent | PepperDesignBlog.com

Well, give fabric a good 30 years to sit and it will totally make a come back.

An Even Easy(ire) A-Frame Tent | PepperDesignBlog.com

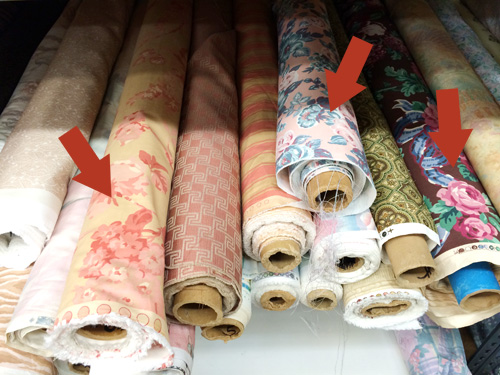
Check out those pretty florals!!

Some are still very outdated, but today I would scoop up many of those rolls if I had projects waiting for them. Funny how that happens.

An Even Easy(ire) A-Frame Tent | PepperDesignBlog.com

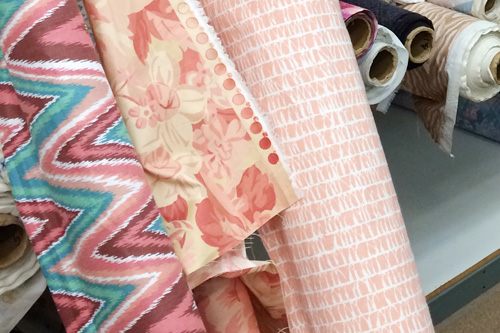
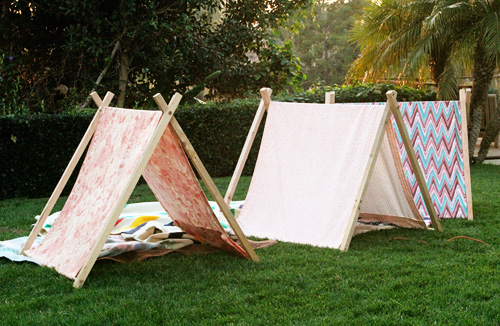
I had trouble choosing, but I had a deadline so I pulled three bolts that worked well together and ran with it. I purchased three yards of each pattern.

livs3rdbirthday_camping_tents7_500

Now here’s where we made our a-frame tents simpler. I love no-sew iron on hem tape like I love my Bodie (that’s my sweet yellow lab). I love fabric spray adhesive like I love my children.

An Even Easy(ire) A-Frame Tent | PepperDesignBlog.com

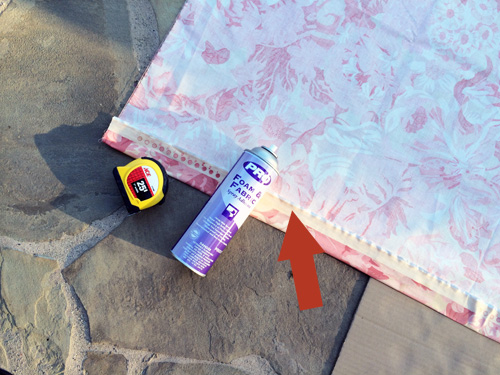
For projects that are temporary – like toys for kids that will come and go, tablecloth runners that will one day be ruined, curtains that need a quick lift – I don’t mind using a spray glue at all. So while most tent tutorials called for sewing the hems and pockets for the dowels, I pulled my trusty can off of the shelf. (Sure, it won’t last forever and I won’t be putting my glued hems through the wash, but I don’t anticipate these a-frame tents lasting ten years either. And if a bit of fabric comes apart I can always spray it in place again. Bonus.)

There are many great brands out there and I haven’t found one that I prefer over others. I used the one above because it was a left over canister from the foam portion of the cushions for the girls’ room.

An Even Easy(ire) A-Frame Tent | PepperDesignBlog.com

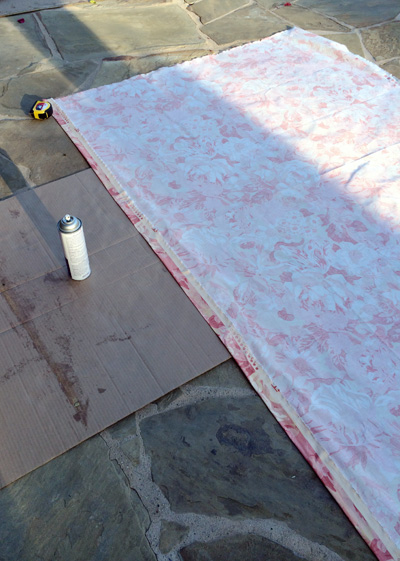
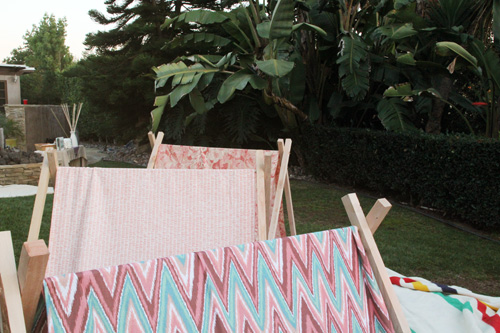
Soooo with spray glue in hand, my mother-in-law helped me trim my fabric into 42×96″ giant strips. For reference, I chose that width of fabric because the length of the tents (due to the dowels used in assembly) were 48″, and after connecting them to the wood on the frame the space remaining between each wooden ‘x’ was roughly 43″ (42″ gave a little bit of wiggle room). Once dry, the fabric strip was draped over the top of the a-frame. The extra fabric at the base of each tent side was wrapped around the dowels at the base to create a pocket around the dowel and the two adjoining pieces of fabric were sprayed together (not to the wood but fabric to fabric). Excess fabric on each side was trimmed.

Done!

And there’s the story of our 30 minute a-frame tents. That’s 10 minutes per tent. Supplies needed per tent? 3 dowels, 4 strips of wood, 3 yards of fabric, one canister of spray glue.

An Even Easy(ire) A-Frame Tent | PepperDesignBlog.com

An Even Easy(ire) A-Frame Tent | PepperDesignBlog.com

I love me a quick and satisfying DIY project, and I hope you consider giving this one a go. More details from Liv’s 3rd pajamas-smores-camping themed birthday posted here, and tutorial by A Beautiful Mess here.

Liv's 3rd Camping Birthday | PepperDesignBlog.com

Organizing Magazine Tear Sheets

I’ve honed down my monthly magazine subscriptions to: Better Homes & Gardens and House Beautiful (for home inspiration – though I’m thinking of ending the last one), Martha Stewart (for recipes and crafty ideas), Lucky (fashion), Money (investment inspiration) and San Diego Magazine (for local stuff). I consider it to be a small number ;-), but still I have stacks and stacks waiting for me in my office because I rarely have the time to actually read them – and when I do, I rarely want to toss them!

My solution isn’t quite rock solid yet, but to keep from a true mountain of magazines I do try to dog ear pages as I go and then pull those pages to keep tear sheets of favorite ideas only. It keeps me from saving 100 pages of a magazine I love to just my top 5-10 pages. I mark the pages up with a sharpie before I store them so I know what on that page I loved. If I have time I clip around that item, too (for example, might be the dining room chairs or rug and not really the entire room).

Organizing Magazine Tear Sheets | PepperDesignBlog.com

Here’s where my plan sort of falls apart. Right now I have a wire basket at the top of of one of my bookshelves in my office that I toss all tear sheets into. Then I have sort of a two part system that includes filing a craft picture under ‘craft ideas’, or adding it to a plastic sleeve for future inclusion in some sort of inspiration binder.

That’s my system for over three years… it needs a bit of work.

On the plus I have a small(er) stack of magazines to keep around, on the negative I have an ever growing tear sheet pile (of stuff too good to toss) that needs some love! How do you sort your favorite magazines/ideas?

Liv’s 3rd ‘Camping’ Birthday

On Sunday we celebrated Liv’s 3rd birthday with a ‘camping’ themed party.

Liv's 3rd Camping Birthday | PepperDesignBlog.com

Two of her favorite things to do these days are to go to Nana & Papa’s (now that they live in our area) and to roast marshmallows in the big outdoor fire pit that they have in their backyard. When I suggested a camping themed birthday with those two ideas in mind, Liv was over the moon. When we talked about everyone coming in their pajamas, she thought that that was just the coolest thing ever.

Liv's 3rd Camping Birthday Invitation | PepperDesignBlog.com

We held the party on a Sunday afternoon so that we could catch the sunset and roast marshmallows just after it was dark. I was coming back from a week long business trip (the girls and my mom came with me) and was totally exhausted, so I’m really thrilled with what we were able to pull together the day of the party with help from our families :-). Score one for late afternoon parties.

Liv's 3rd Camping Birthday | PepperDesignBlog.com

Since the party was going to be outdoors and since it would be chilly, we planned the evening to be around the fireplace and a movie projector for a short film.

Liv's 3rd Camping Birthday | PepperDesignBlog.com

As we were setting up, Liv kept dancing around the different tables of food and decorations – she was so thrilled! And that made me so happy knowing that her little ‘camping & s’mores’ party vision was coming to life.

Liv's 3rd Camping Birthday | PepperDesignBlog.com

Liv's 3rd Camping Birthday | PepperDesignBlog.com

She reorganized fallen marshmallows, adjusted the project table to her liking, redid the chalkboard sign announcing her big day.

Liv's 3rd Camping Birthday | PepperDesignBlog.com

Liv's 3rd Camping Birthday | PepperDesignBlog.com

I had put a little forethought into the afternoon and had originally planned on a giant lean-to sort of sheet structure so that all of the kids could watch the outdoor show together (and keep warm), but day-of changes called for a new idea and we went with three little a-frame tents.

The tents were the easiest project! We followed this tutorial to a T and besides the trips to the fabric store (I scored all three of the below fabrics from the discount $2.98/yard table), the hardware store for wood and an oops-the-drill-ran-out-of-batteries emergency trip, it took all of 30 minutes to assemble the bunch. The building portion (no nails, screws or glue, just drilling and dowels) was Kev’s contribution to the party, my mother-in-law used a fabric adhesive (no stitches here) to ‘hem’ and attach the strips of fabric to their frames. Kev was back watching the football game (did you see that Charger’s game?) in no time.

Liv's 3rd Camping Birthday | PepperDesignBlog.com

Liv's 3rd Camping Birthday | PepperDesignBlog.com

The project table that I mentioned earlier was to make ‘candy’ necklaces to later nibble on while watching the show. My mom came up with the cute idea of stringing fruit loops and Liv helped sort the colored cereal into cupcake tins and little cups. We used floss as string so that the cereal could easily be bitten off, just like you would with a real candy necklace.

This would have been the perfect idea for a party of girls – and maybe required a little too much concentration for our group of mostly 3-4 year-old-boys ;-). The cereal was soon gobbled up one snack cup at at a time.

Liv's 3rd Camping Birthday | PepperDesignBlog.com

I didn’t get a picture of the camping-style spread that we served, but my mom was instrumental in creating a delicious dinner for all guests.

My favorite was the s’mores table! What Liv was really looking forward to was roasting marshmallows with all of her friends, so that’s exactly what we did.

Liv's 3rd Camping Birthday | PepperDesignBlog.com

Liv's 3rd Camping Birthday | PepperDesignBlog.com

We made s’mores take home kits as favors for all of the kids.

Liv's 3rd Camping Birthday | PepperDesignBlog.com

As soon as the sun set we bundled the kids up in warm blankets and tucked them all together for a short showing of ‘Bob the Builder’. In twenty minutes the laptop overheated creating a frozen screen, and then we lost audio for a good chunk – but the kids were so enamored with the giant ‘screen’ that I don’t think any of them even noticed.

Liv's 3rd Camping Birthday | PepperDesignBlog.com

Liv's 3rd Camping Birthday | PepperDesignBlog.com

S’mores with friends.

Liv's 3rd Camping Birthday | PepperDesignBlog.com

Liv's 3rd Camping Birthday | PepperDesignBlog.com

And a round of story telling fireside.

Liv's 3rd Camping Birthday | PepperDesignBlog.com

Then cake time! I made a small s’mores cake so that she’d have three candles to blow out.

Liv's 3rd Camping Birthday | PepperDesignBlog.com

(Sorry about the scary face).

Liv’s 3rd birthday camping party was a birthday success! And I’m excited about reusing those a-frame tents for playtime around the house or in the backyard :).

I call Liv my little monkey because she has so much energy and is such an incredible joy to be around – I’m so blessed to have a daughter as smart, beautiful and full of life as this one. Days like this make me happy that I get to honor and shower with love a girl so deserving of special attention and time.

She has a killer ‘cute’ face, too.

Liv's 3rd Camping Birthday | PepperDesignBlog.com

PS a link to Liv’s 2nd birthday party which was all about the pink, and here’s her first, with my favorite diy table skirt of all time.

Related Posts Plugin for WordPress, Blogger...