A Little of This & That… Renovating, Decorating, DIY Projects & Family

Bringing the Outdoors In, a New Houseplant Collection

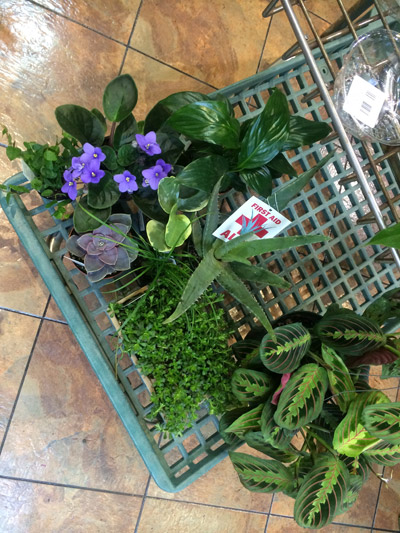
On Sunday, while I was on my own with the girls for a bit, I took a trip to the nursery.

Houseplants | PepperDesignBlog.com

I am officially committed to bringing some of the outdoors in this spring and my office (which receives a ton of natural light) felt like a good place to start.

Houseplants | PepperDesignBlog.com

Houseplants | PepperDesignBlog.com

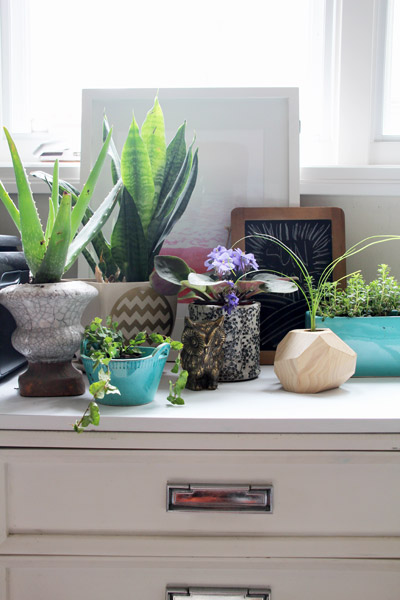
I have been drawn to clusters of potted plants lately… all of my inspiration is here. I’d post some of the actual photos with you but I’d rather you had nothing to compare to just yet.

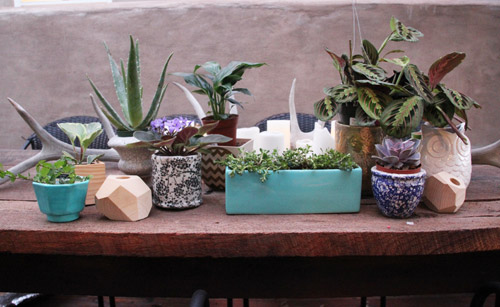
After I got home that afternoon, I pulled my crazy assortment of collected containers from all over the house. I always knew that I was hoarding these pretty little vases, pots and ceramic odds and ends for a reason. Perhaps they were always intended for a serious houseplant collection!

Houseplants | PepperDesignBlog.com

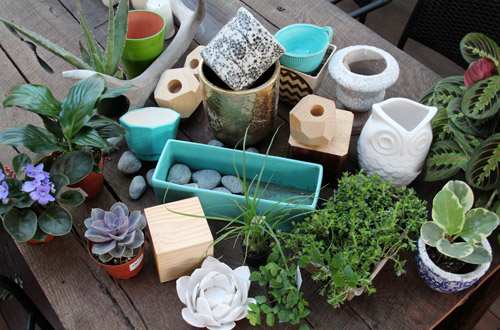
At the nursery, I had been drawn towards a mix of lime, forest green and purple. When I had collected my pots I was happy to see that I actually had a little theme there, too in the form of bright turquoise, porcelain white and gold (with a navy and natural wood container here and there).

Houseplants | PepperDesignBlog.com

I had a rough idea of the final layout, but I played around a bit on our deck before choosing which plant would end up where. Most of these plants will grow fast and will need a bigger container at some point, but I have enough to go around! And I will just repot as necessary.

Houseplants | PepperDesignBlog.com

I chose to shop our local Armstrong nursery mostly because I wanted to pick the brain of an expert horticulturalist. I knew that I could find many of the varieties I was searching for at my local Lowe’s or Ikea for a lower price, but being the newbie houseplant lady that I am, I thought it wise to double and triple check that my selections were compatible with the space I had in mind, and to confirm on plant care. I was surprised when he actually rearranged my chosen selections a few times, but happy to bring home ‘easy’ varieties that would do well in indirect light.

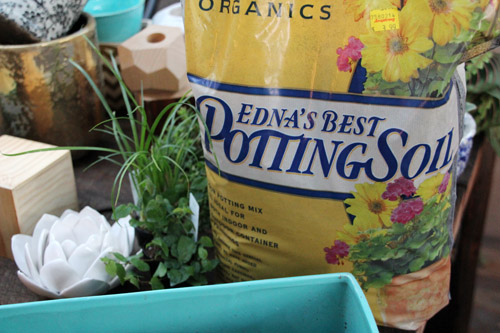
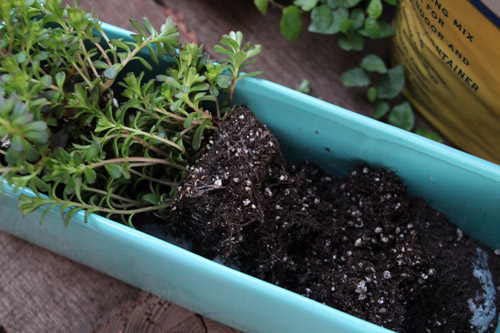
While there, I picked up a bag of the recommended potting soil for my repotting purposes.

Houseplants | PepperDesignBlog.com

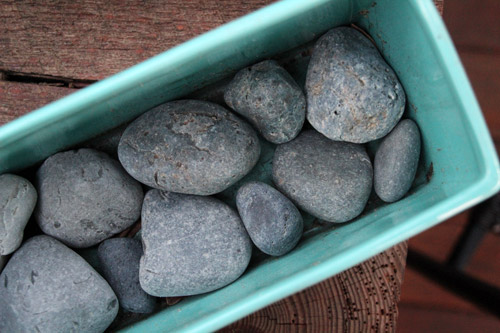
The one bummer about 90% of my saved vessels is that they don’t have drainage holes. This can be devastating for houseplants (and how I’ve previously killed several of mine) so I purchased plastic trays and used river rock in everything (and am crossing my fingers). The plastic trays mean that I didn’t repot those plants whose purchased plastic pots already fit in a container I have at home, I’m just putting a small plastic tray at the bottom of the actual pot to catch water and prevent root rot.

The river rock is something that I had on hand. I will use ice cubes for watering plants with river rock at the base so that water absorption is incredibly gradual in the soil, and so that no water pools at the bottom of the rocks.

Houseplants | PepperDesignBlog.com

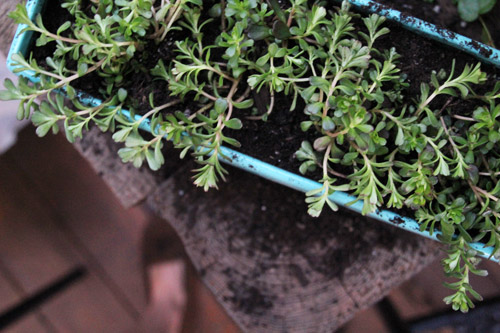
When repotting, I used just a bit of the new soil and then most of the existing soil that the plants came home in. I gently massaged the roots to break them up before introducing them to their new home.

Houseplants | PepperDesignBlog.com

Houseplants | PepperDesignBlog.com

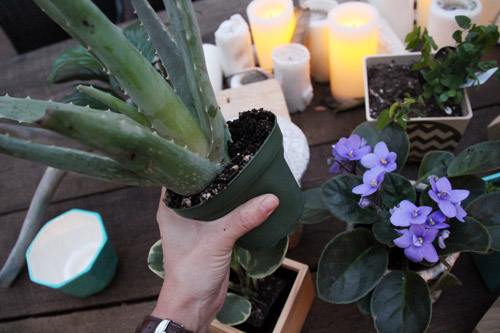
Aloe may have been what I was most looking forward to adding to our house. We grew up with a big aloe plant in my parent’s bathroom, when one of us had a boo boo we instinctively went to the plant, broke off a tip and rubbed our raw skin with fresh, gooey aloe. It was nature’s medicine at its best.

Here I am squeezing her out of her existing pot (no pulling, just squeezing) for replanting. She’s one that will definitely need a bigger pot in the future (again, fingers crossed).

Houseplants | PepperDesignBlog.com

A little bit of water for the startled plants as they adjust to their new homes, and into the house they go!

Houseplants | PepperDesignBlog.com

Houseplants | PepperDesignBlog.com

Houseplants | PepperDesignBlog.com

Houseplants | PepperDesignBlog.com

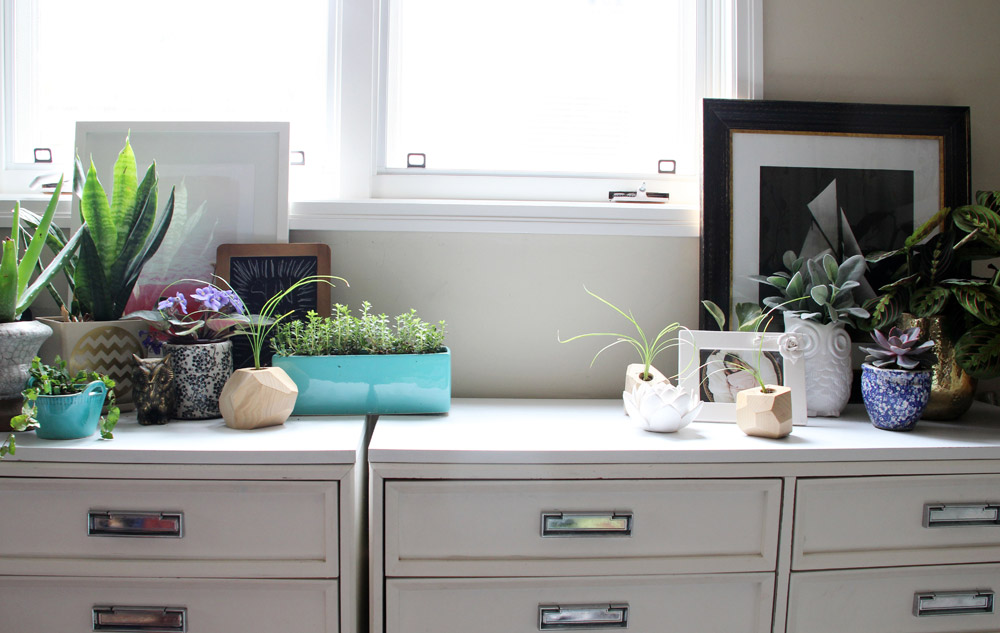
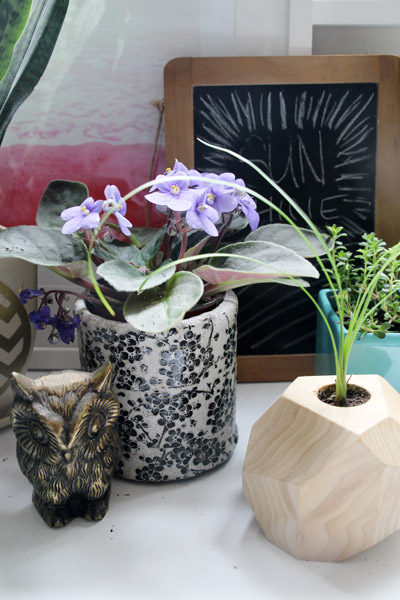
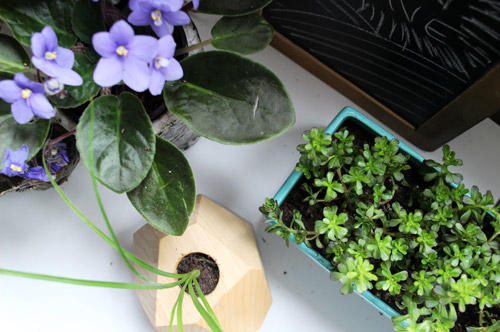
Those three wooden faceted planters are from Uncommon Goods and are possibly my favorites. They bring so much dimension and character with their usual geo shapes, they help to mix up a collection of round and rectangular pots.

Houseplants | PepperDesignBlog.com

If I start feeling like a crazy plant lady, I may break up my new collection and reallocate around the house. It’s already feeling verrrry houseplanty in here (but I’m not complaining yet).

On the plus side, I’m going to have a lot of clean air in this room.

Houseplants | PepperDesignBlog.com

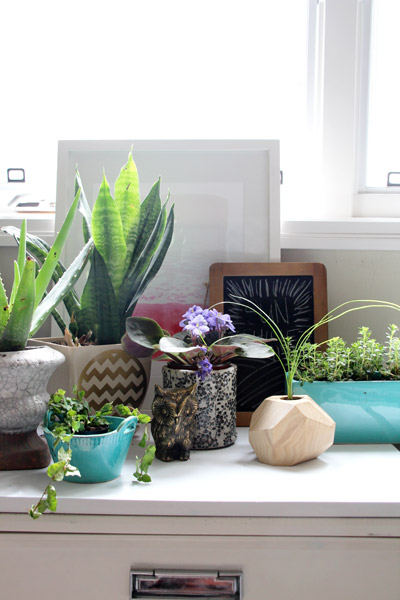
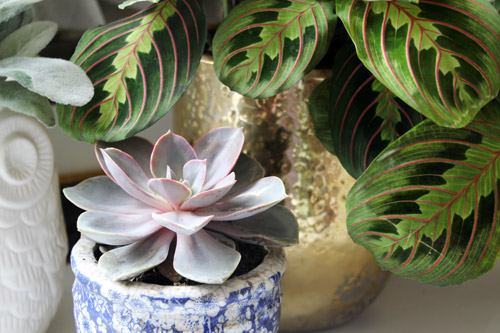
Assorted pots were found at various thrift stores and garage sales, though I did pick up that gold guy and the ceramic white with black flowers at Anthropologie recently for a really excellent price ($12 each, maybe?). My favorite wooden faceted planters were c/o Uncommon Goods. They came with beautiful airplants which I was sure were artificial. Until they died. Now they are repotted with a very small ponytail palm that the gardner from Armstrong specifically recommended. The turquoise rectangular pot is from a going-out-of-business sale at a boutique in my neighborhood, the navy ceramic a find that I toted back from Iowa (wrapped in clothes and stuffed in a suitcase) two years ago. The gold chevron from this lady’s first business venture, original snake plant still going strong!

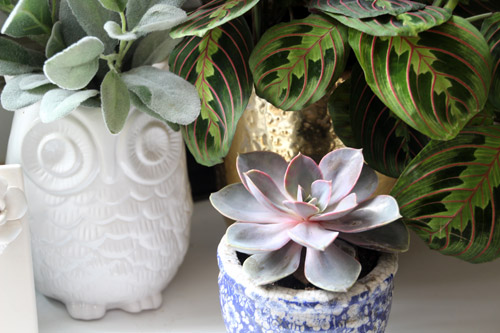
Plants include: above mentioned ponytail palms, rosette succulent (Perle von Nurnberg is the color), sedum ground cover in the rectangular turquoise pot, African violets in the white and black, aloe vera in my white urn, two different pothos’ (super easy to care for, I have one in the bedroom, too), a crawling fig (that will definitely need a larger pot),a snake plant and one fake impostor – can you spot him?

Houseplants | PepperDesignBlog.com

Wish my sweet little thumb luck!

Guest Post: A Bright & White $3k Kitchen Remodel

I have two posts to share with you today. Mary, from over at A Mama Collective, asked me a while back if I would share her kitchen transformation on the blog. I was totally smitten with her new glass tile backsplash and their diy skills, and was very happy to share their (under $3k makeover) story with you. I asked Mary to put together that journey in her own words.

Meanwhile, she and her blogging co-host Jenna, asked if I would share my thoughts on motherhood in their February series. The theme is how love finds a way to weave  into our lives despite some of the more enduring struggles (busy-ness, temper, comparing to others…) of motherhood. I thought on this for a while. This topic is raw, this topic is real. Sometimes I much prefer to blog about paint colors and cocktails. But I accepted their challenge and you can read one of my completely transparent thoughts on guilt that I put together Saturday morning over here.

Back to Mary’s story… I’ll let her take it from here.

*************************************************************

A Mama Collective Guest Post | Kitchen Transformation | PepperDesignBlog.com

A Mama Collective Guest Post | Kitchen Transformation | PepperDesignBlog.com

 Since the moment I first walked into our then, soon-to-be home, I have been dying to re-do the kitchen.  Four years later, that dream finally became a reality.  Funds were limited, time too, but we managed to change our least favorite space in our house into our favorite. With a good amount of willpower, the right supplies, maybe even some connections, I bet you could do the same!  Let me tell you how we transformed our kitchen from drab to fab!

A Mama Collective Guest Post | Kitchen Transformation | PepperDesignBlog.com

Before

We knew new cabinets were not in the cards for us, so we decided to invest sweat equity and give them a makeover ourselves.  Our cabinets are that weird mix of wood and laminate, which makes for an interesting time painting, but interesting doesn’t mean impossible.  I did a good amount of research on how to paint cabinets and found this site and this site to be my new best friends.  (Thanks for the tips ladies!)

The most important tip, in my experience, is to get the cabinet doors as clean as possible.  And when you think you’re done, nope, clean them again!  We had A LOT of grime, grease and just overall buildup on our cabinets (see photo below) and I noticed that the paint had a harder time sticking the first round.  By the second round I decided to really put some muscle into my scrub and that seemed to do the trick.

A Mama Collective Guest Post | Kitchen Transformation | PepperDesignBlog.com

The second big tip is to invest in good, high quality paint.  Due to being on a budget, I fought the urge to buy the cheap paint for some time.  Reading Jenny’s experience with Benjamin Moore’s Advance paint sold me.  It’s this amazing water/oil mix.  I know what your thinking, oil and water don’t mix, and yeah, that’s why this paint is worth the money.  This revolutionary paint works on wood, laminate and that weird mix of wood and laminate that we have.  It’s easy to work with and applies evenly.  And the finish, well, I can’t say enough about the beautiful finish of this product, glossy, but thick and durable.  And since we completed this part of the project a couple months back, I have even had the great pleasure of cleaning them, and it was a breeze.  Some new stainless steal hardware, courtesy of an eBay find, and we already had an amazing update to our little kitchen.

A Mama Collective Guest Post | Kitchen Transformation | PepperDesignBlog.com

Next came the demo, aka my husband’s job.  He and a good friend took some mallets to those yucky white tiled counters, and I’m sure they got some pent up aggression out in the process.  This step was by far the messiest of all and it took a good couple of weeks to not feel like I was spreading that fine dust all around my house.

Then came the installation of the granite, which we did not DIY. ;)  We have a great friend who was able to get us a great deal on our granite, and really without that, I’m not sure if this project would have come to fruition.  Over the moon about the generosity of friends like him!

A Mama Collective Guest Post | Kitchen Transformation | PepperDesignBlog.com

We also updated our microwave and stove, and our sink and faucet.  Don’t underestimate the power of little details!  This great, modern, square sink combined with the stylish, contemporary faucet by Kraus is one of my favorite parts of our new kitchen.

A Mama Collective Guest Post | Kitchen Transformation | PepperDesignBlog.com

Once that was all installed, we were on to the backsplash.  As you can see, we have quiet the small kitchen, so we were able to go with a darker color to contrast with the white cabinets.  Grey, glass, 3×12 subway tiles were the perfect choice to create the warm, inviting, but modern feel we were hoping for.  Glass subway tiles are beautiful, but they are a pain in the, well you know what, to cut.  Order extra if you are planning to install yourself, like we did.  We lost many pieces to the learning curve.  Eventually it was a combination of a score and snap tile cutter and the right blade on the wet-saw  (Diamond Blade) for those curved cuts that did the trick.  Thank God for YouTube and the internet, teaching us all how to DIY.

Installation with glass subway tiles can be a bit tricky too. The 3×12 subway tiles that we chose did not come with the mesh backing that I hear makes instillation a piece of cake.  This means you lay each piece individually and place spacers in between.  It also means if you look really close to our wall you will see the rise and fall of the tiles.  Nothing major to the average on-looker, but to my stubborn self, it’s a bit of a disappointment.

A Mama Collective Guest Post | Kitchen Transformation | PepperDesignBlog.com

Overall, I am in love with my new, fabulous kitchen.  Also pretty darn proud that we did all of this for under $3,000 and that my husband and I didn’t kill each other or any of our children throughout the 3 month process.  I’m calling it a success, friends, success indeed!

Happy DIY’ing!

A Mama Collective Guest Post | Kitchen Transformation | PepperDesignBlog.com

*************************************************************

Thanks, Mary! How great are their new countertops? My favorite is still that beautiful grey glass backsplash.

A Really Great Gin & Tonic

I have more recently started to explore cocktails. I’ve always enjoyed a nice cocktail, but I’ve never really taken the time to learn the whys and hows and whats in creating them. Except maybe for this homemade kahlua from Christmas of last year and a truly homemade White Russian.

Warmer weather calls for something a bit cooler and I’ve found my new hook…

A Great Gin & Tonic | PepperDesignBlog.com

I won’t pretend to know an incredible amount about what I say next, but I will confirm that this is one of the best (and easy to make) cocktails that I’ve enjoyed at home. This gin and tonic is not just any gin and tonic – it’s the big sister of that go-to bar drink from back when you had just graduated college and suddenly needed a better well drink than the ol’ rum and coke.

This is the grown up version of a gin and tonic and it’s really rather delicious.

A Great Gin & Tonic | PepperDesignBlog.com

Secret here? A splash of St. Germain (the perfect ‘splash’ liqueur) and a blend of both lime and lemon juices.

A gin & tonic is the perfect transition into spring – it’s light and crisp and refreshing. It’s nice to enjoy with dinner or by the pool. Squeeze in a bit of fresh orange juice and you’ve turned it into the perfect brunch drink.

A Really Great Gin & Tonic Recipe

1 part top shelf gin
2 parts tonic
squeeze of lime juice & lemon juice
splash of St. Germain

A Great Gin & Tonic | PepperDesignBlog.com

On a side note, I dig cool ice cube trays. Totally takes cocktail hour to a new level. I have round ones, stir stick-style trays and these favorite square cube versions:

A Great Gin & Tonic | Awesome Ice Cube Trays | PepperDesignBlog.com

Do you prefer a sweet/savory/spicy/refreshing cocktail or a nice glass of wine? Do you indulge at home or save it for the mixology professionals at the restaurants? Warning: this one is yummy.

A Great Gin & Tonic | PepperDesignBlog.com

PS you can find a round up of recipes (including a few more beverages for spring) right here.

On another note – how was your weekend? We were supposed to travel for a wedding and then Kevin had a last-minute, out-of-the-blue work issue he had to take care of and we ended up staying back (I don’t think I’ve ever had to cancel our rsvp for a wedding, it’s a terrible feeling. Especially last minute). That led to a lazy Saturday, a yummy bbq and a hike around a mucky lake on Sunday.

Related Posts Plugin for WordPress, Blogger...