A Little of This & That… Renovating, Decorating, DIY Projects & Family

Girls’ Room: DIY Wooden Circle Wall Knobs

I found these really cool round wall knobs for Liv and Taylor’s room. Perfect new addition for getting sweaters and coats and mini backpacks up off of the floor and organized. But I was a little dissuaded by the price and the idea that I could make something similar (and perhaps more fun) that served the same functionality.

Girls' Room DIY Wooden Circular Wall Hooks | PepperDesignBlog.com

I sat on the idea for a while. I thought that building blocks-turned-wall-knobs would be cute. And then perhaps wooden puzzle pieces (I’d hijack something like one of these just like I did for these art canisters).

Girls' Room DIY Wooden Circular Wall Hooks | PepperDesignBlog.com

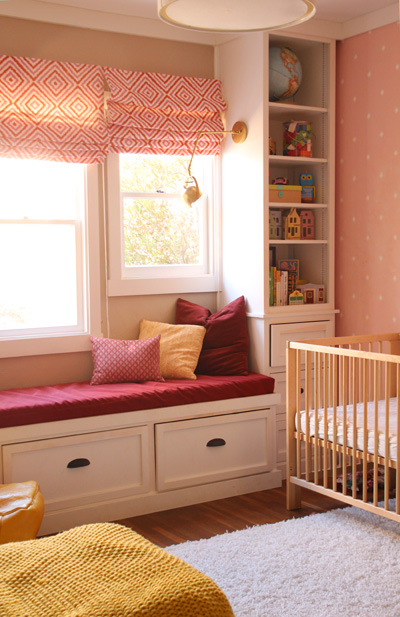
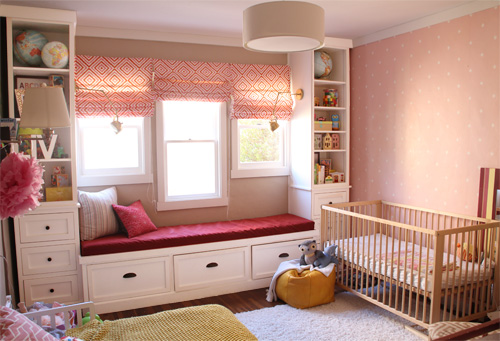
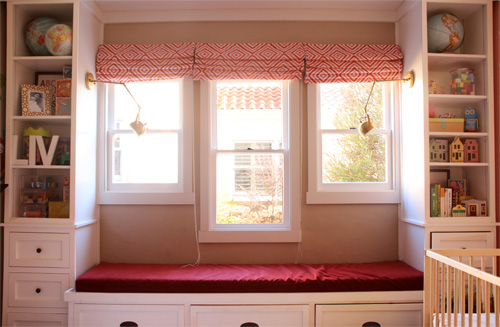
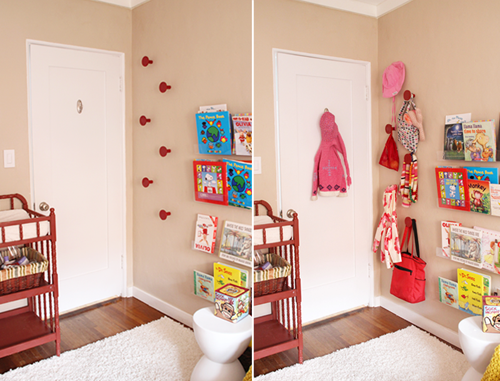
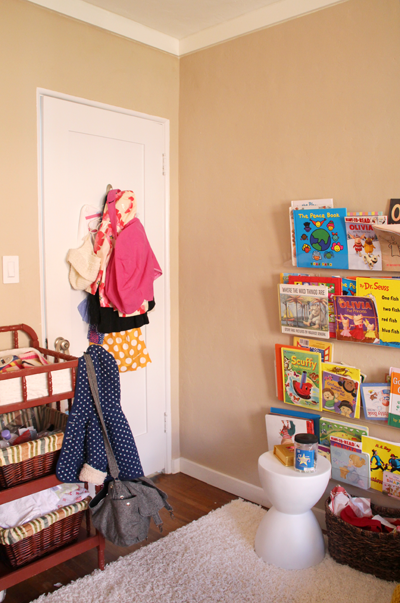
This corner needed an organization solution so badly! Jackets, hats, scarves, bags for the library, bags for eating out at a restaurant or for church on Sunday (you know, crayons and what not), and plenty of hook-worthy accessories were piling up on our changing table, the floor, in toy boxes… it was getting frustrating.

The idea for something creative kept brewing and brewing… it felt like there were too many fun possibilities. But then I decided that this space has a lot going on and what it really needs are just some simple round wall knobs.

Girls' Room DIY Wooden Circular Wall Hooks | PepperDesignBlog.com

Having had cut perfect wooden circles for me in the past, I reached out to The Junkman. He’s awesome – he has been an Etsy go-to for me since I met him virtually (via browsing his shop) over a year ago. If there’s a small carpenter project (that would be okay to mail) that I can’t tackle, and if the hubby or my kind neighbor are both busy, The Junkman comes to the rescue.

When I shared my project idea with him, I was hoping that he could help me cut the top circular pieces for 1″ dowel chunks that I had had on hand. I was then going to use tack nails and wood glue to connect the circular rounds to the dowel chunks and add a drywall nail to the back end for installing in the wall. He shared with me that he thought he might have a better, stronger way to make these and asked if he could send the knobs completed. I was thrilled with the idea (so awesome!) and happily accepted his offer.

He sent me some behind the scenes pics…

Girls' Room DIY Wooden Circular Wall Hooks | PepperDesignBlog.com

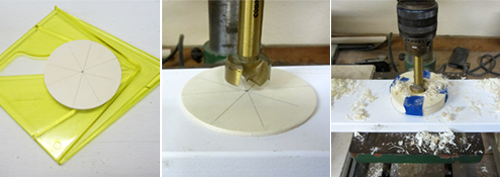
I also asked if he would send one disassembled so that I could share the pieces all with you today should you be needing a similar wall organization solution.

Girls' Room DIY Wooden Circular Wall Hooks | PepperDesignBlog.com

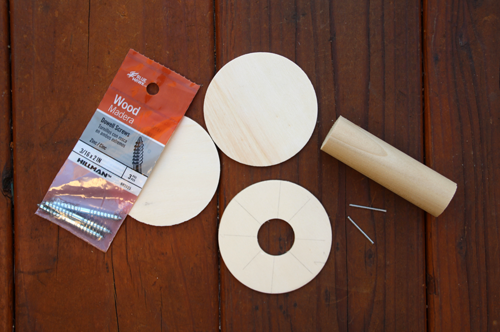
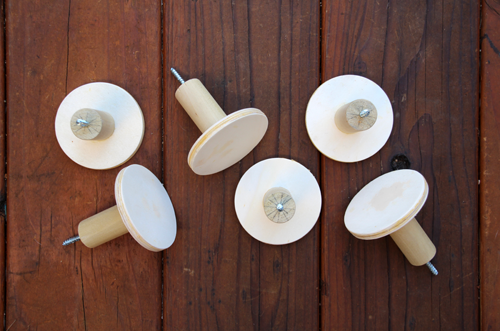
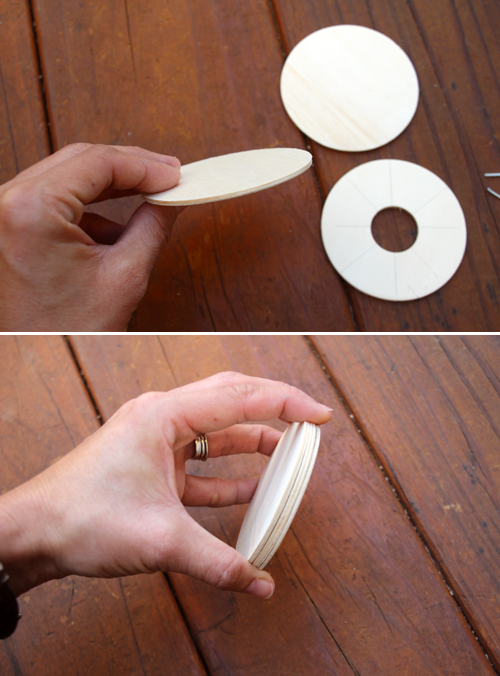
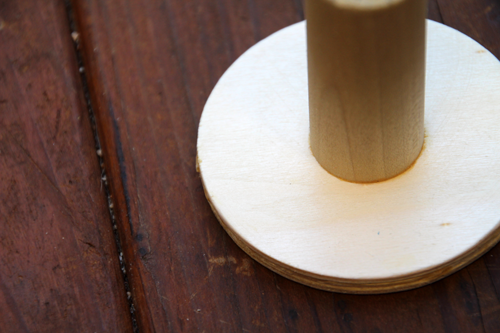
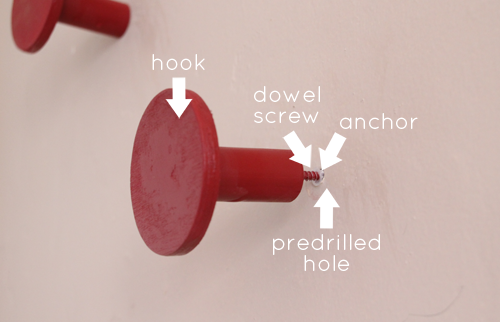
The top part of the knob is actually two thin solid circular disks and one thin disk with a hole the size of the dowel. When all three disks are stacked, they create a thick, sturdy hook for clothing and bags. The disks are 1/8″ x 3″ on their own and 3/8″ x 3″ stacked. Wood glue holds the disks together, two small tack nails hold the middle disk to the dowel piece. More on that in a second.

Girls' Room DIY Wooden Circular Wall Hooks | PepperDesignBlog.com

The bottom half of the hook is the dowel. The dowel used is a 1″ dowel cut into 3″ lengths. A predrilled hole allows for a dowel screw to be twisted half way in.

Girls' Room DIY Wooden Circular Wall Hooks | PepperDesignBlog.com

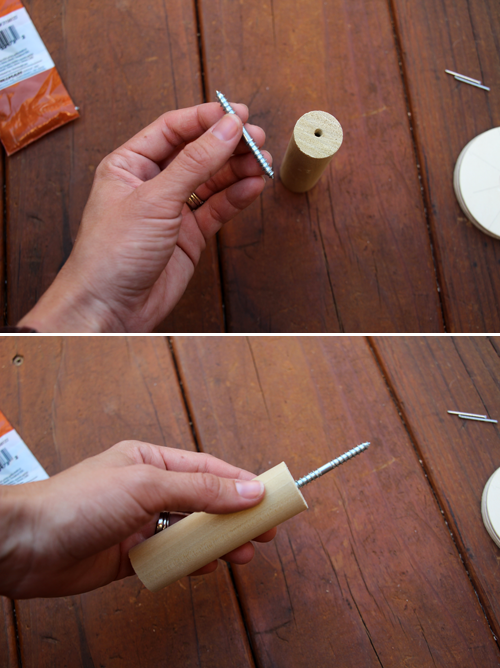
(I should have kept twisting for the picture – that above picture was 1/4 of the way in.)

Here is the order of assembly: glue 1/8″ disk with dowel-sized hole to 1/8″ disk with no hole. Insert dowel into disk with hole and glue in place. Use tack nails to secure dowel to round wood disk. Glue final 1/8″ disk to top of other disks for that seamless look (now your tack nails and glue are covered and your dowel is securely attached).

Girls' Room DIY Wooden Circular Wall Hooks | PepperDesignBlog.com

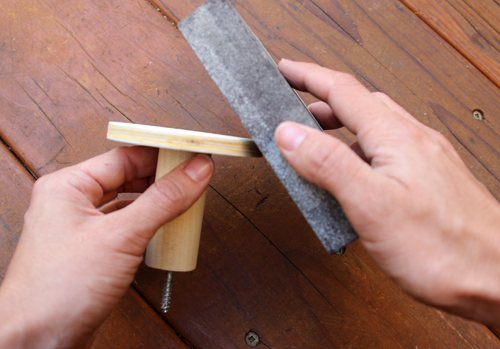
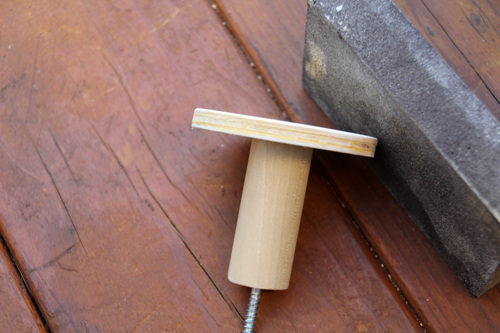
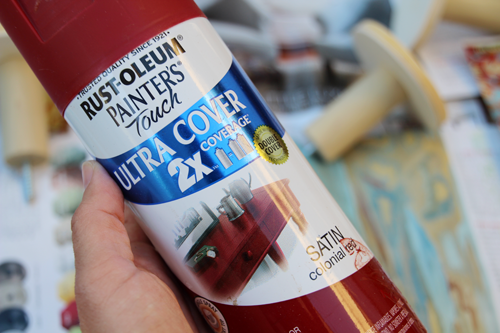
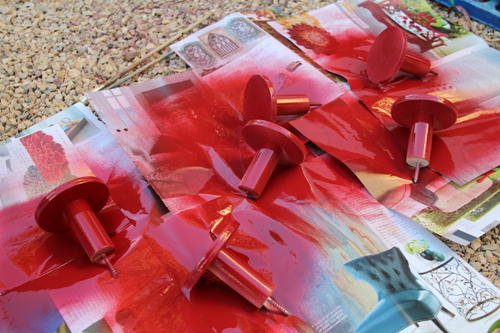
Upon receiving the knobs in the mail, I gave them a good sanding and a thorough coating of Rust-o-leum’s burgundy red spray paint. Time being my favorite spray painting friend, I painted the knobs over the course of a couple of days as I lightly coated, waited for knobs to dry, lightly coated, waited for knobs to dry, flipped knobs, lightly coated, waited for knobs to dry… about ten times. This makes for a really even finish with no drips which is so key in not having to redo a paint job.

Girls' Room DIY Wooden Circular Wall Hooks | PepperDesignBlog.com

Girls' Room DIY Wooden Circular Wall Hooks | PepperDesignBlog.com

Girls' Room DIY Wooden Circular Wall Hooks | PepperDesignBlog.com

Girls' Room DIY Wooden Circular Wall Hooks | PepperDesignBlog.com

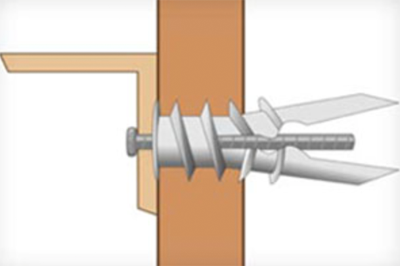
I carefully measured out my hook locations with a pencil and yard stick on the nursery wall. Then I predrilled holes for the screws and drywall anchors (since these guys were not being secured into studs but rather just the drywall) and into those holes I tapped the plastic anchor sleeves and finally screwed in the wall knobs by hand (with a little muscle :)).

Here’s how a drywall anchor works: as you twist the screw into the plastic sleeve (which is sitting in your predrilled hole) it expands to create a secure grip. They are a must if you’re not working with a stud (husbands don’t count).

Girls' Room DIY Wooden Circular Wall Hooks | PepperDesignBlog.com

illustration source

Girls' Room DIY Wooden Circular Wall Hooks | PepperDesignBlog.com

Girls' Room DIY Wooden Circular Wall Hooks | PepperDesignBlog.com

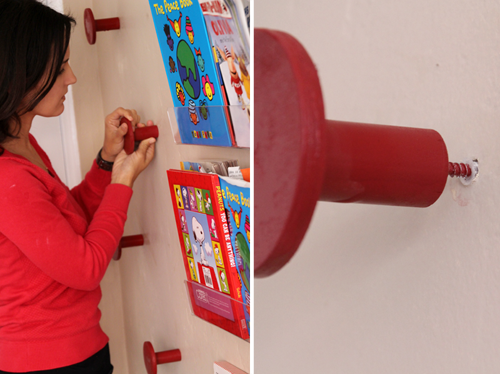
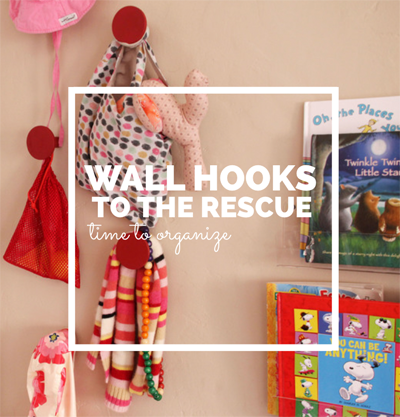
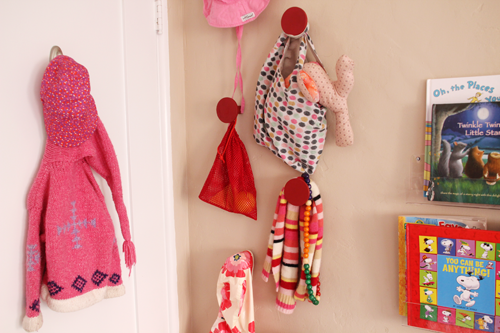
Oh I’m so thrilled with the final result! These are perfect for hanging miscellaneous items that used to swing from the door knob, changing table or pile up on the floor. Now I store jackets, sweaters, backpacks, tiny purses and anything else that the girls have floating around or need easy access to. For everything a home and a home for everything.
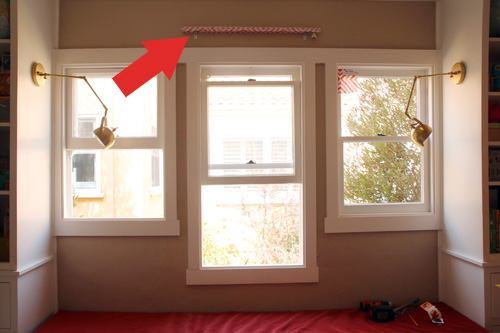
Before:

Girls' Room DIY Wooden Circular Wall Hooks | PepperDesignBlog.com

After:

Girls' Room DIY Wooden Circular Wall Hooks | PepperDesignBlog.com

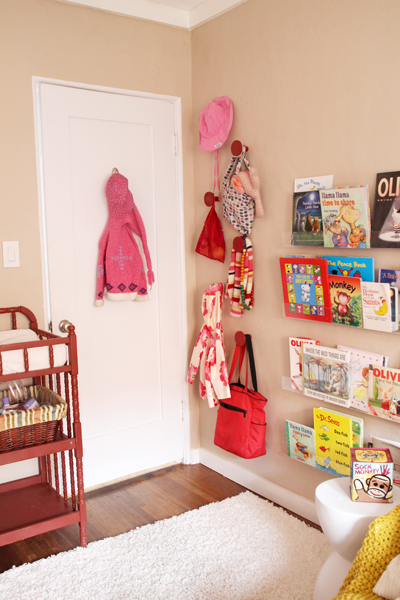
This room is going through a re-sorting at the moment (hence the missing changing table basket) and some items are finding permanent homes in drawers and what not as well. I’ve also moved frequently used items (hats for the park, spare diaper bag that’s great for the beach) out to the hooks so that they’re easy to find.

Girls' Room DIY Wooden Circular Wall Hooks | PepperDesignBlog.com

Now back to piling more stuff on those knobs. Any item still left on the floor of the room or still hanging from the changing table – beware.

PS More on the transformation of this space here – check out the other side of the room and the new roman shades over here.

PPS There are some great wall hook ideas out there, you might enjoy this version of a similar project and this one too.

Party Inspiration: Welcome, Spring!

Well hello new season. Pops of pastels may be in order to welcome this big change in the year (I’m most grateful for an extra hour of daylight in the evening but also for the impending warmer weather) and have pulled together a little party inspiration board. Spring evokes feelings of new, fresh, clean, happy. Come spring I leave our windows and doors open all day to let in fresh air, I get the declutter bug (we cleaned out our entire garage this past weekend) and I find myself gravitating towards pastel colors like mint and peach.

Last year I threw a summer ice cream social for Liv and her friends. We simply celebrated the season with bright colors, a cold dessert, a playful paper hat project and plenty of toddler singing and dancing one warm afternoon. It was sporadic and fun, and now I’m thinking that we should have as many seasonal parties as possible.

Party Theme Inspiration: Welcome, Spring | Pastel Colors | PepperDesignBlog.com

Spring party inspiration:

1. The prettiest pastel wedding (too many ideas to capture)
2. Dipped ombre napkins (instructions here)
3. Striped candlesticks
4. Pastel finger foods (so apparently this is what Turkish Delight is – Narnia, I have always been curious)
5. I must try making my own DIY soda labels
6. I scoop up these colorful straws pretty regularly to keep on hand
7. How clever – pastel chalkboard napkin rings
8. I’m pretty sure I’ll also be trying out some chocolate dipped oreos soon

Welcome back from the weekend! As mentioned above, we spent all of Saturday clearing out our garage to create wide. open. spaces. (sung to the tune of Dixie Chicks while twirling Julie Andrews-style in the center of the garage). It felt awesome to purge and now it feels so great walking into a well-organized space. On Sunday we met up with family and went for a hike plus dinner in Laguna Niguel, a seaside artsy town about an hour and a half north of San Diego. A truly satisfying weekend. Hope yours was as well :).

PS More inspiration boards found here, more party ideas sorted right here.

Girls’ Room: Smitten with the New Roman Shades

This room has come together over time. It’s taken a lot longer than expected (as it usually does), and even with a final vision in mind for the space, each element has been carefully considered and contemplated in a way that is both soothing and totally stressful. I love to create a space. I don’t see just a room, I see children playing on the soft rug and sleeping babies in cribs and toddlers dancing in dress up clothes.

And now that Taylor is an amazing eight months old, I sort of find myself beginning to envision this room as complete. Not complete in a we-can’t-change-anything sort of way, but complete in a this-room-will-grow-with-time sort of way.

Six months ago I ordered fabric for the windows and I have waited on pins and needles to hang the new coverings. I’ve been secretly so nervous that I would totally regret my ages ago decision on a bright and bold diamond print for the roman shades.

Girls' Room: Roman Shades | PepperDesignBlog.com

But I absolutely love it! Instead of feeling overwhelming, the fabric plays so nicely with the solid window seat bench and the wallpaper. I’m almost ready to mix more patterns in with throw pillows. Actually, I’m a little up in the air on what to do about the pillows. I think that that might be one of those ‘time’ things.

Girls' Room Update: March 2014 | PepperDesignBlog.com

Girls' Room: Roman Shades | PepperDesignBlog.com

These windows hug right up against our neighbor’s kitchen and I have always felt just a little bit odd watching them make dinner while rocking the baby to sleep. And I know they have a clear shot of me playing with Liv, reading books, nursing… it was definitely time to get some curtains up.

In regards to light, I installed the roman shades (and left enough fabric to still completely cover the windows when they drop) above the windows so that they could let in as much natural light as possible when pulled all the way up. That’s one of the things I love most about this room! All of that beautiful light!

Girls' Room: Roman Shades | PepperDesignBlog.com

It was a tough time of day to photograph… but I was so excited to share the new window curtains with you :).

I chose to work with Melissa over at Windows by Melissa to have the roman shades made after reading great reviews from her by Kirsten. You guys, she has been the most wonderful individual to work with. The roman shades function perfectly, they were sewn impeccably and were the right price for my budget (especially compared to local bids). I can raise and lower all three shades in a few minutes as I put the girls down for a nap or attempt to wake them up via natural light in the morning. Installation was the easiest thing ever thanks to a couple of tricks Melissa has added to her shades (more on that in a minute).

Girls' Room: Roman Shades | PepperDesignBlog.com

They are up and they are perfect. I walk by the room and let out an audible sigh.

I still plan on doing something about those hanging cords… I initially had purchased ‘cordless roman shades’ through Melissa thinking that the cord was somehow concealed in the sewn shade, but cordless actually refers to there being no cord and a hook and loop mechanism for raising and lowering the shade instead (hence the name, silly me). Thankfully Melissa is so forgiving and was able to re add that cord after I realized my mistake.

Girls' Room: Roman Shades | PepperDesignBlog.com

I found the red and pink diamond patterned fabric through U-Fab (though sadly I’m not sure they have it in stock now) after considering so many variations from Spoonflower, Joann’s, local fabric shops, fabric books, online searching… For me the trick to the roman shades was going to be introducing a pattern of a different scale but one that still fit in with the coloring of the walls and the rest of the room. That’s a difficult oder to fill when the wallpaper (and main pattern) is mostly solid with the exception of small white stars. It’s like a micro pattern played out in large scale. Almost every sample I had just didn’t fit or feel right.

I have to admit that when I finally said ‘yes! I’m doing this’ to my diamond pattern, I felt very daring actually ordering the fabric. I sort of think of myself as much ‘safer’ than that. My main concern was finding a pattern that would grow with the girls and myself, the last thing I wanted to do was completely change them out (or hate them) in just a couple of years. When the fabric arrived in the mail though I was so thrilled that I took the plunge. These guys are awesome in this space and totally give the room life! I can picture them in a more ‘grown up’ version of this room in years to come, too.

Let’s talk about fabric for a moment… I have a really hard time making fabric decisions for the house and it doesn’t help that most online fabric shops offer way more than the eye can possibly take in. It’s like hunting through vast, endless fabric thumbnail images when what we really all need is just a very well-curated selection of beautiful prints in great colors at great prices. I initially heard about U-Fab when they were featured in a giveaway over at Young House Love and I hopped on over to their site to check them out. My fabric hunting exploration went from ‘I can’t find anything I love for this space’ to ‘which of these five patterns would work best’? I ordered samples and hung them in a window for months.

Actually, you can probably see the winning samples in many of the older progress photos from this room.

Girls' Room: Roman Shades | PepperDesignBlog.com

There were two tricks to the installation of these roman shades. The first is that the curtain panel of the roman shade actually completely disengages from the mounting portion via velcro making it a total breeze to install. The second is that they come with and are secured with L brackets, a piece of hardware found at all home improvement stores and an installation system too easy to mess up. I was so happy this was so simple.

Girls' Room: Roman Shades | PepperDesignBlog.com

I borrowed my dad to help me with this two person job (though I’ll admit that he kind of took over from here). Dads are great.

Our steps for installation included: measuring to account for all three shades and where they would be drilled into the wall. Thankfully we were drilling into a header so we didn’t have to worry about plaster screws or anchors. Next up was screwing L brackets into place on the shade mount according to measurements, pre drilling holes into the wall for the bottom half of the L bracket, screwing L brackets to the wall. Bam, bam, bam.

Girls' Room: Roman Shades | PepperDesignBlog.com

Girls' Room: Roman Shades | PepperDesignBlog.com

Girls' Room: Roman Shades | PepperDesignBlog.com

Girls' Room: Roman Shades | PepperDesignBlog.com

Again, the velcro is genius. Rather than become tangled beneath the roman shade as your drilling the mount to the wall, simply separate the curtain panel from the mount.

Girls' Room: Roman Shades | PepperDesignBlog.com

Girls' Room: Roman Shades | PepperDesignBlog.com

The pull cords come pre strung but to separate the curtain panel from the mount via velcro we had to unstring the shades. Thankfully they’re very simple to thread back through once they were up on the windows.

Girls' Room: Roman Shades | PepperDesignBlog.com

I’ve been playing with them for the past few days now. Up, down, half way, two-thirds of the way…

Girls' Room: Roman Shades | PepperDesignBlog.com

I think that I love it when they are mostly all the way up with just one or two with a bit of length…

Too much pink? Just right? It’s good to be a little girl.

Girls' Room: Roman Shades | PepperDesignBlog.com

I’m over here typing and smiling ear to ear about this space. The custom bookshelves, the wallpaper, the gold lights, the roman shades… it’s my happy place right now. If you’re curious about those details, the transformation of this space is chronicled right over here in the girls’ room gallery.

Baby, you’ve come a long way.

Before Shots of Our Home | PepperDesignBlog.com

Now I think the only projects left in here might be artwork, figuring out that throw pillow bit, installing a new sweet arm light for above Liv’s bed (came today!), wall hooks for backpacks and such, finishing touches on some new art boards and some serious organization for Liv’s ‘makers space’. I guess we have a few more projects to go…

This post was sponsored in part by U-Fab who provided the fabric for these roman shades as a sponsor of the site. 

Related Posts Plugin for WordPress, Blogger...