A Little of This & That… Renovating, Decorating, DIY Projects & Family

Living Room Love: A Finished Mantel!

Remember when our living room fireplace looked something like this? the mantel was in need of a makeover.

One day I’d like to either knock down the brick to expose an original (fingers crossed) fireplace or fill in the brick with plaster to create a Spanish-style fireplace to match the house. Until then though, my first thought was to create a solid beam look by fitting a wooden box to the top of the current mantel. Kind of like the last image in this post.

So… I took my ideas and layout to my local hardware store that has a milling department and we created a mitered edge box that was just what I had in mind. But it came back looking like this.

And now, we’re finally back on track!

First up is staining. Since different types of wood will each have their own unique look with different types and colors of stain, I flipped the wood mantel over and tried out three different stains. The perfect shade? We chose the red mahogany in the center.

If our mantel had been cut from a softwood (uneven wood grain or blotchy patterns indicate that wood might be softwood), I would add a pre-stain wood conditioner to prevent an uneven covering (the conditioner seeps into the wood to create a consistent surface). Back when we were choosing materials originally, my carpenter friend recommended a vertical grain cut, this means that the growth rings run at 45 degrees and that the wood was quarter-sawn at the lumberyard – it increases the hardness by 20%, is a bit more expensive, but it looks beautiful.

Staining step-by-step:

1. Stir stain well.

2. With rubber gloves on, I used a brush (you can also use a sponge or old rag) to cover the bottom of the mantel. Applying stain to the bottom first means you don’t have to worry about dripping while the mantel is upside down! Or I should say the stain will still drip, but you’ll be covering it up when you stain the front – and cover it up quick, that dripping stain dries immediately. Next up is the top of the mantel and then finally the front, making sure to brush in one continuous movement in the same direction of the grain.

3. I then let the first coat of stain dry and reapplied several times.
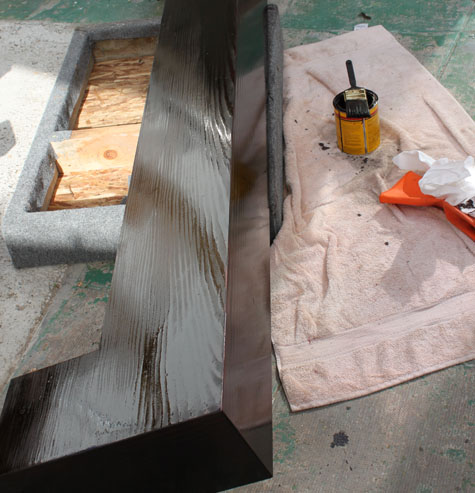
4. It’s a good idea to apply a top coat of polyurethane to seal in the mantel (and off gasses) and to protect it from water rings from future vases, wine glasses, etc.

5. The entire mantel stayed outside for 3-4 days to prevent any off gassing in the house.

Here she is, all dressed for Easter! It makes such a difference in the room, I love it.

The extent of our Easter decorations this year is fresh flowers and beautiful hand blown eggs decorated by my Mom when she was my age.

What a neat gift to pass down through the generations, right?

My dad recently sent us this picture that he took of Liv when she was just two weeks old, he had it mounted on photo board – I love her little expression and her little scrunched forehead. So alert when she was so young!
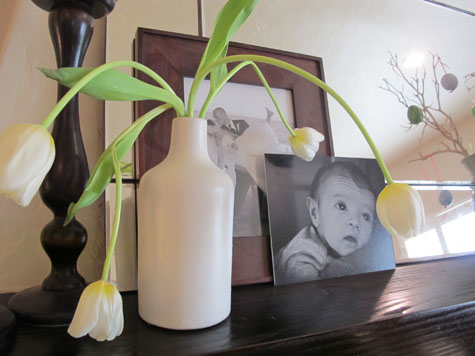
And now the living room has a brand new look!

More living room posts: mantel progress, updating a fireplace mantel part 1, bookshelf styling tips, decorating in layers: stage 1, inspiration boards, picking the perfect couch, custom lampshade, coffee table-to-ottoman, and the‘before’ photos.

High/Low Quiz: Can You Guess the Budget Room?

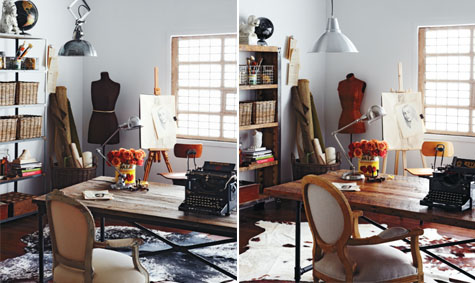
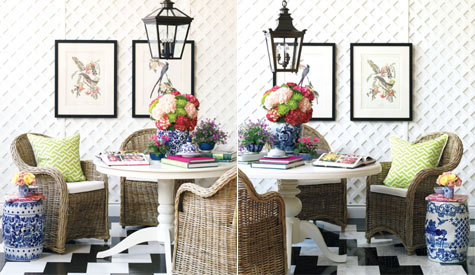
This is clever. Styleathome.com designed 15 beautiful rooms on both a high scale and low budget version. Can you guess which is which?

Tricky, right? Here are three more.

For the rest of the quiz (plus sourcing and final budget pricing), head out to here.

Now for the answers!
1. Low/High, 2. High/Low, 3. Low/High, 4. High/Low, 5. High/Low, 6. Low/High

Favorite Baby Products for the First 3 Months

Liv is three months this week! Wow it seems like it was just yesterday that we brought her home from the hospital.

Being the new parents that we are, there are a few products that have helped to make the transition a little easier. I thought I’d share with you a few of my favorite finds.

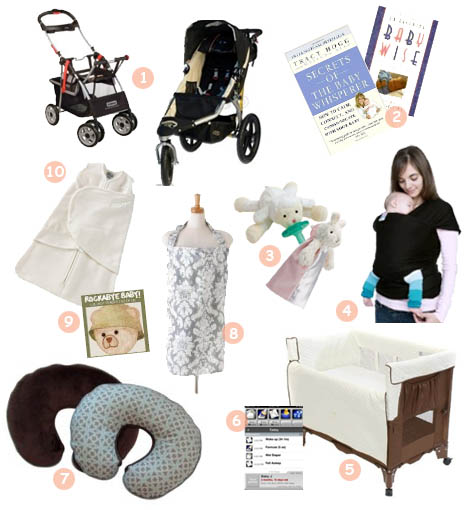
Best Baby Tools First Three Months

Clockwise from top:

1. Jeep Car Seat Carrier & Bob Revolution: While it’s definitely not necessary to have two strollers, we’ve found that our quick snap-and-go stroller is a dream for trips to the grocery store and other errands (easy to fold and our Graco Snugride carseat fits right in), while our Bob Revolution is great as a walking and park stroller (we use it ALL the time!).

2. Baby Wise & Secrets of the Baby Whisperer: These two books have been our everyday resource for introducing a new baby into our lives, and vice versa. The tips on schedules (we keep a pretty relaxed but somewhat regular schedule) and sleep training are invaluable – Liv began sleeping through the night at 8 weeks (the a few exceptions here and there…).

3. First Friends & Wubbanub: The newborn soothie pacifier is amazing – but it’s a lifesaver when attached to the Wubbanub or First Friend! These, along with the above books, can be credited for Liv’s sleeping patterns. When she spits out or drops her paci, the stuffed animal on her chest keeps it within reach to grab again! It’s a-mazing.

Wubbanub

A little demo in how both the First Friend and Wubbanub works. When Liv falls asleep in one of her sleepsacks with her paci, I like to keep a very thin blanket over her pacifier (rather than swaddling it directly into her sleepslack which could be dangerous) so that when she spits it out and wakes up again, there it is! Of course you don’t need the blanket on top to help begin the self-soothing process, but I find it can help.

4. Moby Wrap: We’ve taken Olivia everywhere in the Moby Wrap – from playing in the snow to walking the streets of New Orleans while on vacation to sporting events to shopping around town. She loves it and it’s so very comfortable for Mom and babe.

Hint: It can be tough running errands with a baby that you have to take in and out of a carseat at each stop – I wear the Moby while driving – without her in it, of course – so that when we stop I can slip her right into the Moby at each errand. It beats carrying a heavy carseat everywhere.

Black Moby Wrap

5. Arms Reach Cosleeper: Liv sleeps right next to our bed in her cosleeper. It’s wonderfully convenient to not have to get up out of bed in the middle of the night to nurse and it’s nice to safely ‘co-sleep’ during her first few months. We use the risers now (not shown in picture below) to bring the cosleeper up even with our bed.

Cosleeper

6. Total Baby iPhone App: This app keeps my life in order – well, my life so far as Liv’s schedule goes. It tracks when she eats, on which side, for how long, etc. It also includes cool tools such as sleep tracking and diaper counting. By checking my phone I can predict when she’ll be ready for her next nap and if she’s crying because it’s time to eat or time to sleep.

7. Boppy: I love my boppy nursing pillow! I wish that I had one in every room because it makes nursing so easy with its wrap around shape.

8. Udder Cover: Speaking of making nursing easier, my Udder Cover is big and breezy and super convenient for nursing on the go. I use it almost everyday and because of its light material (the actual pattern I own is linked in the name) I don’t worry about it being too warm for Liv beneath the cover. The boning around the top of the cover is a hands-free way to keep an eye on her.

9. Rockabye Baby, U2: You won’t mind listening to the same lullaby cd again and again when it’s a rendition of Coldplay, Bob Marley or U2. In fact you’ll look forward to hitting play each time you rock baby. Another great lullaby source? Looping Lullabies – check the site out to hear a few soothing samples.

10. Halo Sleepsack: We have several sleepsacks to rotate throughout the week but one of our favorites is this version by Halo. Because Liv was born in the winter, and because blankets can be dangerous, this super cozy sleepsack both swaddles and keeps her warm all night long. I don’t worry about a blanket covering her face and her arms don’t wake her up when they’re snuggled by her side.

And there you have it! I hope it’s helpful for all of you mom’s-to-be, current mommies, aunts, grandmas, etc!

And just for fun, a little video of Liv singing at three months old:

Ahhh, too cute. She just learned that her little voice has pitch and that she can control it.

If you have any favorite products or tips of your own, feel free to share!

Related Posts Plugin for WordPress, Blogger...