
I have two posts to share with you today. Mary, from over at A Mama Collective, asked me a while back if I would share her kitchen transformation on the blog. I was totally smitten with her new glass tile backsplash and their diy skills, and was very happy to share their (under $3k makeover) story with you. I asked Mary to put together that journey in her own words.
Meanwhile, she and her blogging co-host Jenna, asked if I would share my thoughts on motherhood in their February series. The theme is how love finds a way to weave into our lives despite some of the more enduring struggles (busy-ness, temper, comparing to others…) of motherhood. I thought on this for a while. This topic is raw, this topic is real. Sometimes I much prefer to blog about paint colors and cocktails. But I accepted their challenge and you can read one of my completely transparent thoughts on guilt that I put together Saturday morning over here.
Back to Mary’s story… I’ll let her take it from here.
*************************************************************
Since the moment I first walked into our then, soon-to-be home, I have been dying to re-do the kitchen. Four years later, that dream finally became a reality. Funds were limited, time too, but we managed to change our least favorite space in our house into our favorite. With a good amount of willpower, the right supplies, maybe even some connections, I bet you could do the same! Let me tell you how we transformed our kitchen from drab to fab!
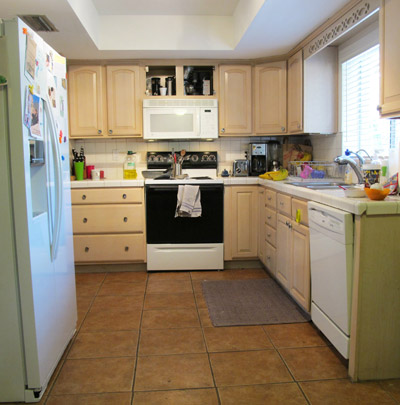
Before
We knew new cabinets were not in the cards for us, so we decided to invest sweat equity and give them a makeover ourselves. Our cabinets are that weird mix of wood and laminate, which makes for an interesting time painting, but interesting doesn’t mean impossible. I did a good amount of research on how to paint cabinets and found this site and this site to be my new best friends. (Thanks for the tips ladies!)
The most important tip, in my experience, is to get the cabinet doors as clean as possible. And when you think you’re done, nope, clean them again! We had A LOT of grime, grease and just overall buildup on our cabinets (see photo below) and I noticed that the paint had a harder time sticking the first round. By the second round I decided to really put some muscle into my scrub and that seemed to do the trick.
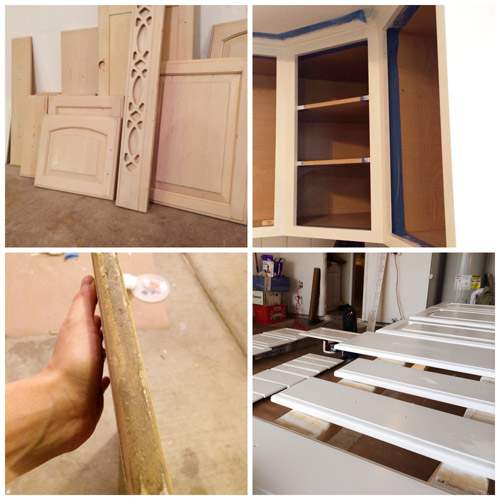
The second big tip is to invest in good, high quality paint. Due to being on a budget, I fought the urge to buy the cheap paint for some time. Reading Jenny’s experience with Benjamin Moore’s Advance paint sold me. It’s this amazing water/oil mix. I know what your thinking, oil and water don’t mix, and yeah, that’s why this paint is worth the money. This revolutionary paint works on wood, laminate and that weird mix of wood and laminate that we have. It’s easy to work with and applies evenly. And the finish, well, I can’t say enough about the beautiful finish of this product, glossy, but thick and durable. And since we completed this part of the project a couple months back, I have even had the great pleasure of cleaning them, and it was a breeze. Some new stainless steal hardware, courtesy of an eBay find, and we already had an amazing update to our little kitchen.
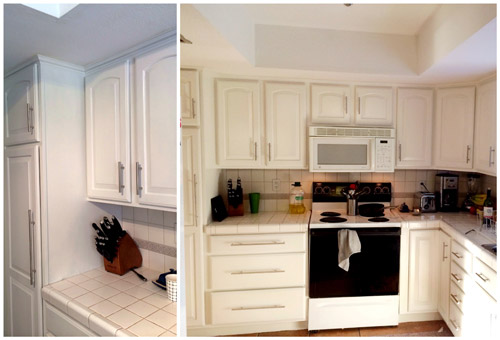
Next came the demo, aka my husband’s job. He and a good friend took some mallets to those yucky white tiled counters, and I’m sure they got some pent up aggression out in the process. This step was by far the messiest of all and it took a good couple of weeks to not feel like I was spreading that fine dust all around my house.
Then came the installation of the granite, which we did not DIY. ;) We have a great friend who was able to get us a great deal on our granite, and really without that, I’m not sure if this project would have come to fruition. Over the moon about the generosity of friends like him!
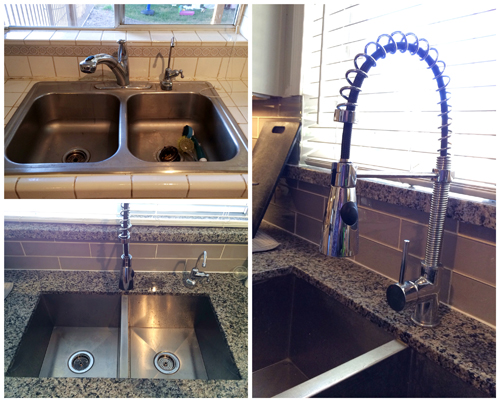
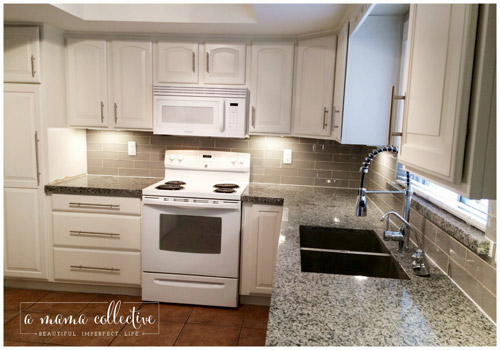
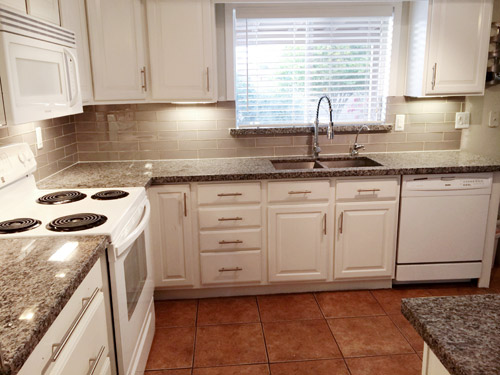
We also updated our microwave and stove, and our sink and faucet. Don’t underestimate the power of little details! This great, modern, square sink combined with the stylish, contemporary faucet by Kraus is one of my favorite parts of our new kitchen.

Once that was all installed, we were on to the backsplash. As you can see, we have quiet the small kitchen, so we were able to go with a darker color to contrast with the white cabinets. Grey, glass, 3×12 subway tiles were the perfect choice to create the warm, inviting, but modern feel we were hoping for. Glass subway tiles are beautiful, but they are a pain in the, well you know what, to cut. Order extra if you are planning to install yourself, like we did. We lost many pieces to the learning curve. Eventually it was a combination of a score and snap tile cutter and the right blade on the wet-saw (Diamond Blade) for those curved cuts that did the trick. Thank God for YouTube and the internet, teaching us all how to DIY.
Installation with glass subway tiles can be a bit tricky too. The 3×12 subway tiles that we chose did not come with the mesh backing that I hear makes instillation a piece of cake. This means you lay each piece individually and place spacers in between. It also means if you look really close to our wall you will see the rise and fall of the tiles. Nothing major to the average on-looker, but to my stubborn self, it’s a bit of a disappointment.

Overall, I am in love with my new, fabulous kitchen. Also pretty darn proud that we did all of this for under $3,000 and that my husband and I didn’t kill each other or any of our children throughout the 3 month process. I’m calling it a success, friends, success indeed!
Happy DIY’ing!

*************************************************************
Thanks, Mary! How great are their new countertops? My favorite is still that beautiful grey glass backsplash.

Love this renovation! My husband and I just finished our kitchen renovation, which was mostly hired out, and I’m impressed by anyone who can tackle a project like this on their own. That just wasn’t in the cards for us, but I’m hoping to DIY more projects down the road that don’t involve moving gas pipes and re-routing plumbing across a room!
http://jax-and-jewels.blogspot.com
Love your kitchen remodel, Heidi!