I drove up the coast of California to visit family this past weekend, but I managed to finish step 1 of making over the new credenza before taking off. As mentioned in this post, I found the perfect sized credenza for the new office (and all of that storage that we’ll need!) on Craigslist.
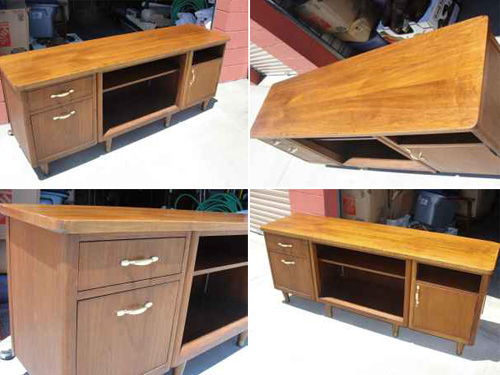
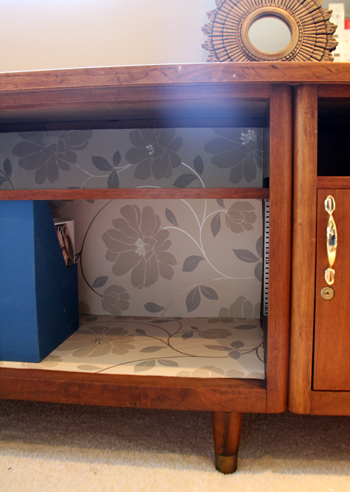
The plan was to paint, add paper to the open shelves and change out the hardware to give it a brand new look.
Once the piece was home and in the space though, I immediately knew that the painting portion of the project wouldn’t be necessary. Once out of direct sunlight, the rich walnut tones were beautiful. When paired with the lighter woods of the desk and bookshelves, the credenza’s color lived up to it’s mid-century modern shape (which is known for rich walnut stains) and was no longer as honey/yellowy as it appears in the above pictures.
The top of the credenza could use some love, and I considered sanding and restaining to see if I could get rid of a couple of stains from long ago. But when it came down to matching the color to the rest of the piece, I knew that restaining could open a bag of worms that might have led to redoing the entire credenza. So we’ll leave it as-is for now with the hope of one day really focusing on the nitty gritty details.
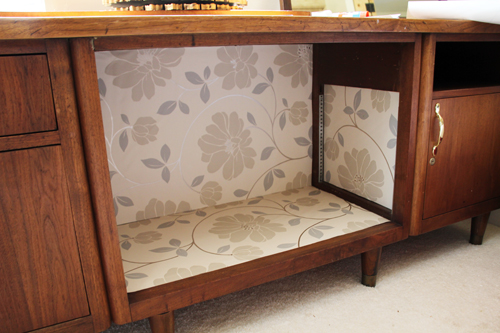
With painting crossed off of the list, I moved right along to wallpapering the open shelves.
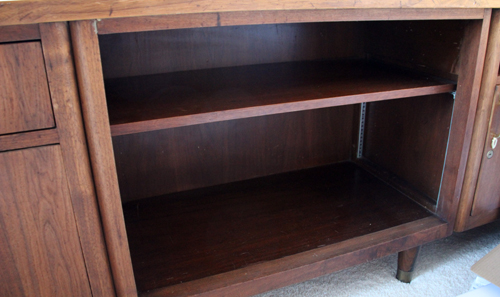
The shelves were screaming for some attention. I’ve added fabric backing to shelves before and I love the look of a pop of pattern and color in an unexpected location, so I began searching for a wallpaper, wrapping paper or sheets of decorative paper (check out the selection at Paper Source) that were large enough to line the back of these shelves without seams.
I settled on this wallpaper from Lowe’s because it has just the right amount of subtle color/pattern to work with a variety of future fabrics that we haven’t quite settled on for the room.
***********************************************************************************
Applying Decorative Paper to Shelves
m
Materials: decorative paper (wallpaper, wrapping paper, handmade paper…), glue stick(s), straight edge, ruler, knife, scissors
{1.} Carefully measure each ‘wall’ of your bookshelf/credenza and cut paper to fit. I’m glad I had an entire roll of wallpaper, I had to recut several times, definitely buy 50% more than you anticipate using because of silly and unforeseen mistakes! I would have hated to have halted the project to run down to the store for more paper. Because the inside of this credenza has varied levels for different shelves, I opted to only line the most inset points. Once the shelf is back in place, I think that that will provide the cleanest look.
{2.} In my search for a non-permanent adhesive, I settled on a glue stick (the standard, kid’s crafts version). I could have pulled out the wallpapering glue from this project or even used double sided tape – but my goal was to have edges that wouldn’t roll up over time and to still create an adhesion that would allow me to replace the paper with a new pattern some time down the road. Cover your paper liberally with the gluebefore adding to the walls of your shelves (but don’t wait too long between applying glue and sticking up or you’ll have extra creases and bubbles).
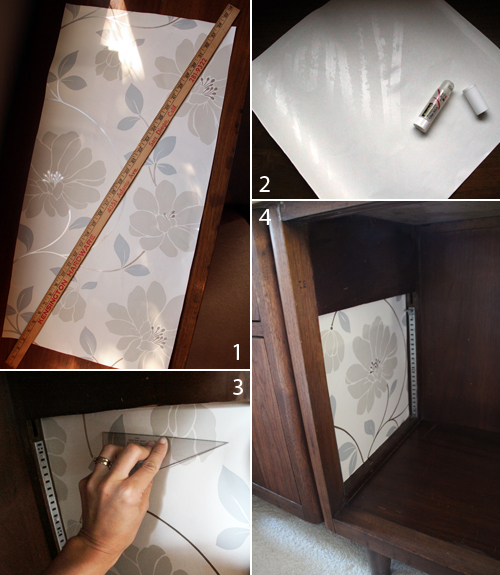
{3.} I used a plastic triangle from my husband’s architectural-supply box for school (though a wallpapering broad knife or smoother – even a standard ruler – would have done the trick) to smooth the paper firmly against the walls of the credenza as I slowly added the sheets of wallpaper. Moving out from one corner across the paper provided the best results and the least amount of bubbles to ‘smooth out’.
{4.} Use a utility knife to clean up any edges that are not directly up against your corners… and then repeat until all walls (and the ceiling) are lined!

***********************************************************************************
Next step is finding some neat hardware to replace the older brass pulls. I’m on the hunt.
More visual inspiration of paper backed shelves from this way-back-when post!
For more Office Makeover posts, check out: finding the perfect credenza, new trim, dining table-to-desk, a new desk & bookshelves, installing remnant carpeting, grasscloth wallpaper, painting the office nook, finding carpet for the office, chocolate brown wall ideas, plastering progress, inspiration for a diy desk, back in action!, desking hunting for under $300, bookcases under $300, inspirational rooms, room layout options, demo part 1 & demo part 2.


Very nice and innovative blog liked it.
Hi Carol, For a slightly more permanent application, try double sided tape or even scrapbooking tape along the very edge of the paper as well. :)
~Morgan
That looks great. You are so resourceful to think of using a glue stick. I have been wanting to do this to a bookcase for ages but have been struggling with what to use so I don’t have to apply the wallpaper.
Erin, that is a great question! I will be sure to update as the next few months go by… I’m sure I’ll want to replace the paper for a new pattern in a few years (when it may show significant wear and tear because it’s not glued using wallpaper paste) so my long term is probably shorter than most people’s. Thanks for the comment!
~Morgan
how does the paper stand up over time with use on the shelves? I have contemplated doing this but fear the paper will look terrible after time.
great!!! Like the idea a lot!
Love the paper you’ve picked!