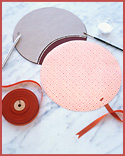
A cute way to incorporate your party colors and theme into personal favors is by making special party hats for each guest! This would be equally fun at a kid’s party as it would an adult dinner party! I’m just picturing all of my guests for my husband’s birthday (which is this Wednesday) sporting these awesome pom hats at the dinner table — it would make a great picture! You can really jazz these up too!
Follow the jump for step-by-step instructions from Martha Stewart Living.
{DIY Party Hats!}
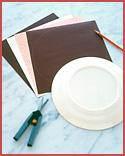
Tools and Materials
Decorative paper
Colored vellum
Sheets of double-sided adhesive
Pencil
9- or 10-inch plate
Scissors
White glue
1/2-inch-wide grosgrain ribbon
{1.} Start by backing two 10-inch squares (9-inch for kids’ hats) of decorative paper with colored vellum: Attach vellum to paper with a sheet of double-sided adhesive. (For the hats shown here, we used one piece of patterned paper and one piece of solid color paper for each hat.) Trace the outline of a 10-inch (or 9-inch) plate onto each square, and cut out the circles.
 {2.} Lay the patterned circle on top of the plain one, overlapping by about one-third the circles’ diameter; attach with white glue. Once the glue has dried, cut slits for the ribbon ties: At seven o’clock on the left circle and five o’clock on the right, cut two parallel 1/2-inch slits, 1/4 inch apart and about 1/2 inch in from the edge. Thread each side with a 12-inch length of 1/2-inch-wide grosgrain ribbon. The ribbon should come out through the inner slit and go back in through the outer slit, leaving a 1/2-inch overhang on the inside of the hat. Glue overhang to the hat’s inner surface.
 {3.} While the glue dries, make the tassel: Cut out a 9-by-5-inch rectangle of vellum. Place it on your work surface with a short side facing you. From the top left corner, measure 2 inches to the right, and mark. Cut in a diagonal line from this point to the bottom left corner; you should have a piece that measures 9 inches long, 3 inches wide at the top, and 5 inches wide at the bottom, with one right angle at the right side of the base. Along the diagonal edge, cut into the vellum at 3/8-inch intervals, stopping about 1 inch short of the straight edge. Place a pencil at the bottom (wider) edge, and roll the strip tightly around the pencil. Carefully curl each segment of the tassel with scissors.
 {4.} Glue the curled tassel into the upper v-shaped indentation between the two circles, and let the glue dry. Bring the other edges of the circles together to overlap by one-third their diameter, and glue them together. Press together until glue is dry.
p
p
p


Hey morgan, just testing the comment page on the blog. :)
test reply
third response
test nested comment
Sweet!
lets see if this works :)
Okay I think it is fixed for real :)
Comment depth 2
dashboard reply test
Just darling. Love your take on party hats!
Sure beats ready-made party hats that we can buy. I will certainly try these. Thanks for the idea.
I am going to try these for sure! Have been wanting to make a party hat (that fits) for a long time. :)